Perpendicular bisector (Constructions)
Watch this topic in 60 seconds
Free preview · Lesson 1
Understanding Perpendicular bisector (Constructions)
Understanding the Perpendicular Bisector: A Foundational Guide for Grade 9
Imagine you have a straight stick, and you want to cut it exactly in half, not just anywhere, but also perfectly straight across, making a 'T' shape with the stick. This idea of cutting something exactly in half and at a perfect right angle is the essence of a perpendicular bisector. It sounds fancy, but it's a super useful and fundamental concept in geometry, especially when you need to be precise!
What's in a Name? Breaking Down 'Perpendicular Bisector'
Let's unpack this term piece by piece, like disassembling a Lego model to understand each brick.
Part 1: Perpendicular
When two lines or line segments are perpendicular, it means they meet or cross each other to form a perfect right angle (90 degrees). Think of the corner of a square, the intersection of a vertical wall and a horizontal floor, or the capital letter 'T'. If you're standing at a crossroads and one road goes perfectly north-south while the other goes perfectly east-west, those roads are perpendicular to each other. They create a perfect 'square' corner.
Analogy: Imagine two roads meeting. If they meet at a sharp angle, it might be dangerous! But if they meet at a perfect 90-degree corner, like a well-designed street intersection, they are perpendicular. This perfect corner is key!
Part 2: Bisector
To bisect something means to divide it into two equal parts. If you have a chocolate bar and you bisect it, you cut it exactly in half, so both pieces are identical in size. If a line segment is bisected, it means a point or another line passes through its exact midpoint, splitting it into two segments of equal length.
Analogy: Think about slicing a pizza or a cake. If you want to share it fairly with just one friend, you'd bisect it right down the middle, giving each person exactly half. A bisector is like that perfect, fair cut.
Putting It All Together: The Perpendicular Bisector
So, a perpendicular bisector is a line, ray, or line segment that intersects another line segment at its midpoint, forming a 90-degree angle. It's like having a stick and drawing a line that not only cuts the stick into two perfectly equal pieces but also crosses the stick at a perfect right angle. It does two jobs at once!
Analogy: Imagine you have a seesaw (the line segment). A perpendicular bisector is like finding the exact middle point where you need to place the pivot (the bisector part) to make it perfectly balanced, and then making sure the pivot stand is perfectly straight up and down (the perpendicular part). If the stand isn't straight (not perpendicular), the seesaw won't balance properly. If the pivot isn't in the middle (not a bisector), it won't balance either!
Why Is This Important? Real-World Applications
Perpendicular bisectors aren't just for geometry class; they're used everywhere! Architects use them to design symmetrical buildings and ensure stability. Engineers use them to find the exact center of objects or to divide space precisely. Even artists and graphic designers use the principles of bisection and perpendicularity for balance and composition in their work.
For example, if you need to install a light fixture exactly in the center of a rectangular room, the perpendicular bisectors of the room's sides would help you find that perfect spot. Or if you're building a bridge, you need to ensure supports are placed precisely and at right angles for maximum strength.
Constructing a Perpendicular Bisector: Step-by-Step Guide
Now, let's learn how to draw one using just a compass and a straightedge (ruler). This is a classic construction and a super satisfying one to master!
Tools You'll Need:
- A pencil
- A straightedge (ruler)
- A compass
The Steps:
-
Step 1: Draw Your Line Segment. First, use your straightedge and pencil to draw a line segment. Let's call its endpoints 'A' and 'B'. This is the 'stick' we want to bisect perfectly. Make it a good length, maybe 5-10 cm (2-4 inches), so you have room to work.
Analogy: This is your starting point, like drawing the initial path on a treasure map.
-
Step 2: Set Your Compass. Open your compass so that the distance between its pointy end and its pencil end is more than half the length of your line segment AB. It doesn't have to be exact, just visually more than halfway. If it's less than half, your arcs won't cross!
Analogy: This is like setting the span of a pair of dividers. You want it wide enough to make big, sweeping marks.
-
Step 3: Draw Arcs from One Endpoint (A). Place the pointy end of your compass firmly on point A. With your compass set, draw a large arc that goes both above and below your line segment AB. Don't press too hard, but make sure the arc is clear.
Analogy: Imagine dropping a pebble in a pond at point A. The arc you draw is like the ripple spreading outwards from that point. You want to see the ripples above and below your line.
-
Step 4: Draw Arcs from the Other Endpoint (B). WITHOUT changing the compass setting (this is crucial!), move the pointy end of your compass to point B. Draw another large arc that also goes above and below the line segment AB. This arc should intersect the first arc you drew in two distinct places.
Analogy: Now drop a second, identical pebble in the pond at point B. The ripples from this pebble will overlap with the first set of ripples, creating two clear points where they cross paths.
-
Step 5: Connect the Intersection Points. You should now have two points where your arcs cross each other – one above AB and one below AB. Use your straightedge to draw a straight line connecting these two intersection points. Extend this line beyond the arcs if you like.
Analogy: These two crossing points are like finding the 'sweet spots' where the ripples perfectly overlap. Connecting them creates the exact path you're looking for.
-
Step 6: Verify (Optional but Recommended!). Take a protractor and measure the angle where your newly drawn line crosses segment AB. It should be exactly 90 degrees. Then, measure the two segments that AB was divided into. They should be exactly equal in length. Voila! You've constructed a perpendicular bisector!
Analogy: This is like double-checking your treasure map to make sure you landed in the right spot and dug in the right direction!
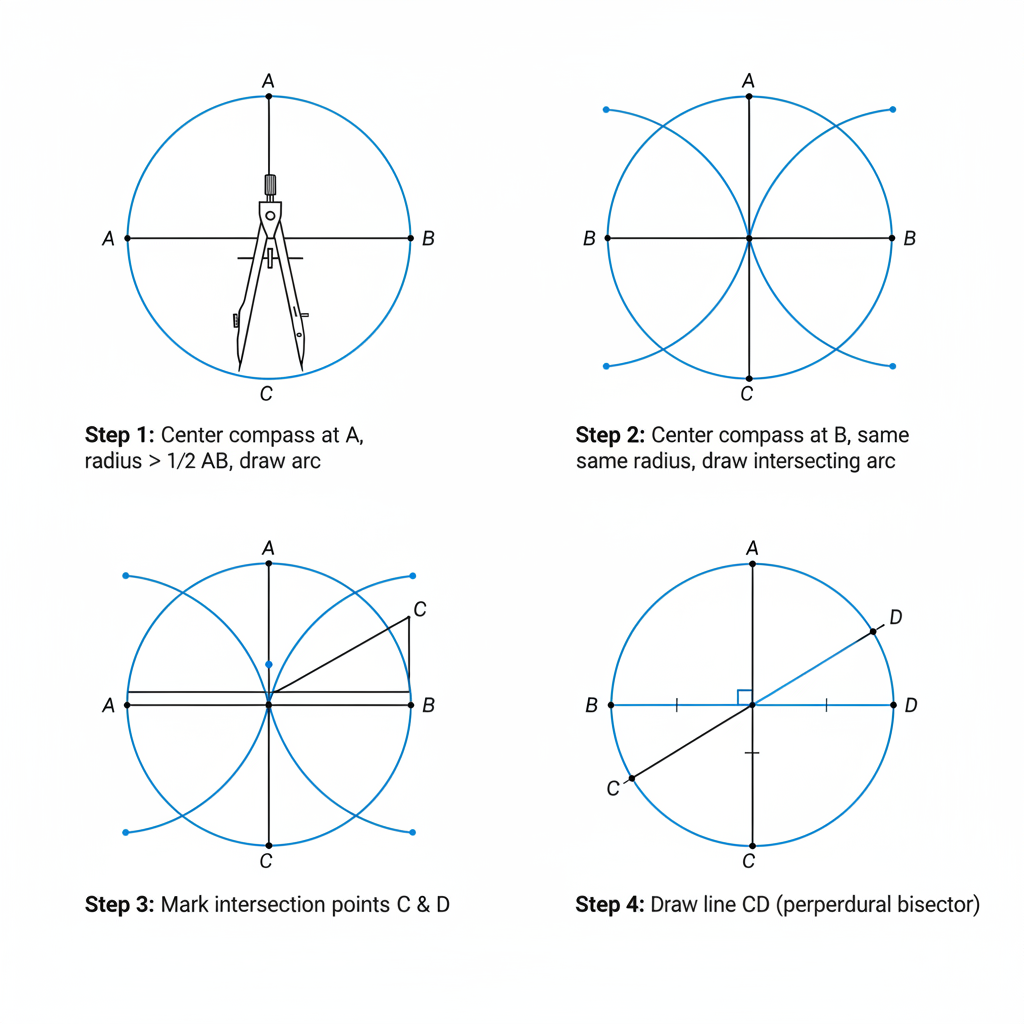 ⚠️ This picture may have spelling mistakes. Trust the words in the lesson.
Why Does This Construction Work? The Magic of Equidistance
The reason this construction works so perfectly lies in a key geometric property: any point on the perpendicular bisector of a line segment is equidistant (meaning 'at an equal distance') from the segment's two endpoints.
When you draw the arcs in Step 3 and Step 4 with the same compass setting, you are essentially finding all the points that are a certain distance away from point A, and all the points that are the *exact same* certain distance away from point B. The two points where your arcs intersect are special because they are equidistant from both A and B. When you connect these two equidistant points, you create a line that is the perpendicular bisector.
Think of it like this: If you had two friends, A and B, standing a certain distance apart. The perpendicular bisector is the imaginary line where everyone standing on it is exactly the same distance from friend A as they are from friend B. It's the 'fair play' line!
Practice Makes Perfect!
The best way to understand and remember this construction is to practice it yourself. Draw several line segments of different lengths and construct their perpendicular bisectors. Pay attention to how the arcs intersect and how precise your final line is. Soon, you'll be a perpendicular bisector pro!
Keep learning, free
Create a free Syllabax account to unlock practice questions and games for this topic.
Visual Learning Enhanced! 🚀
To help you master this topic, we use Advanced Syllabax AI to generate detailed diagrams and visual models.
Note on Visuals: The AI sometimes makes spelling errors in image labels. Please refer to the lesson text for the correct terminology.