Block-Based Coding: Scratch Interface
Watch this topic in 60 seconds
Free preview · Lesson 1
Understanding Block-Based Coding: Scratch Interface
Welcome to Scratch: Your Digital Playground for Coding!
Hey there, future coding superstar! Get ready for an amazing adventure into the world of computer programming with something called Scratch. Imagine you have a special playground where you can build anything you want, bring characters to life, and tell cool stories, all just by dragging and dropping colorful puzzle pieces. That's exactly what Scratch is!
What is Block-Based Coding?
Before we jump into Scratch, let's talk about 'block-based coding.' Think of it like building with LEGOs or putting together a jigsaw puzzle. Instead of typing complicated words that computers understand (which is called text coding), you use colorful, pre-made blocks that snap together. Each block has a special instruction, like 'move forward' or 'change color.' When you connect these blocks, you're giving the computer a step-by-step list of things to do!
Analogy: If text coding is like writing a secret recipe using fancy words and spelling them perfectly, block-based coding is like using picture cards for each step: 'add flour' (picture of flour), 'mix' (picture of mixing bowl). Much easier to see what's happening!
Exploring the Scratch Interface: Your Command Center!
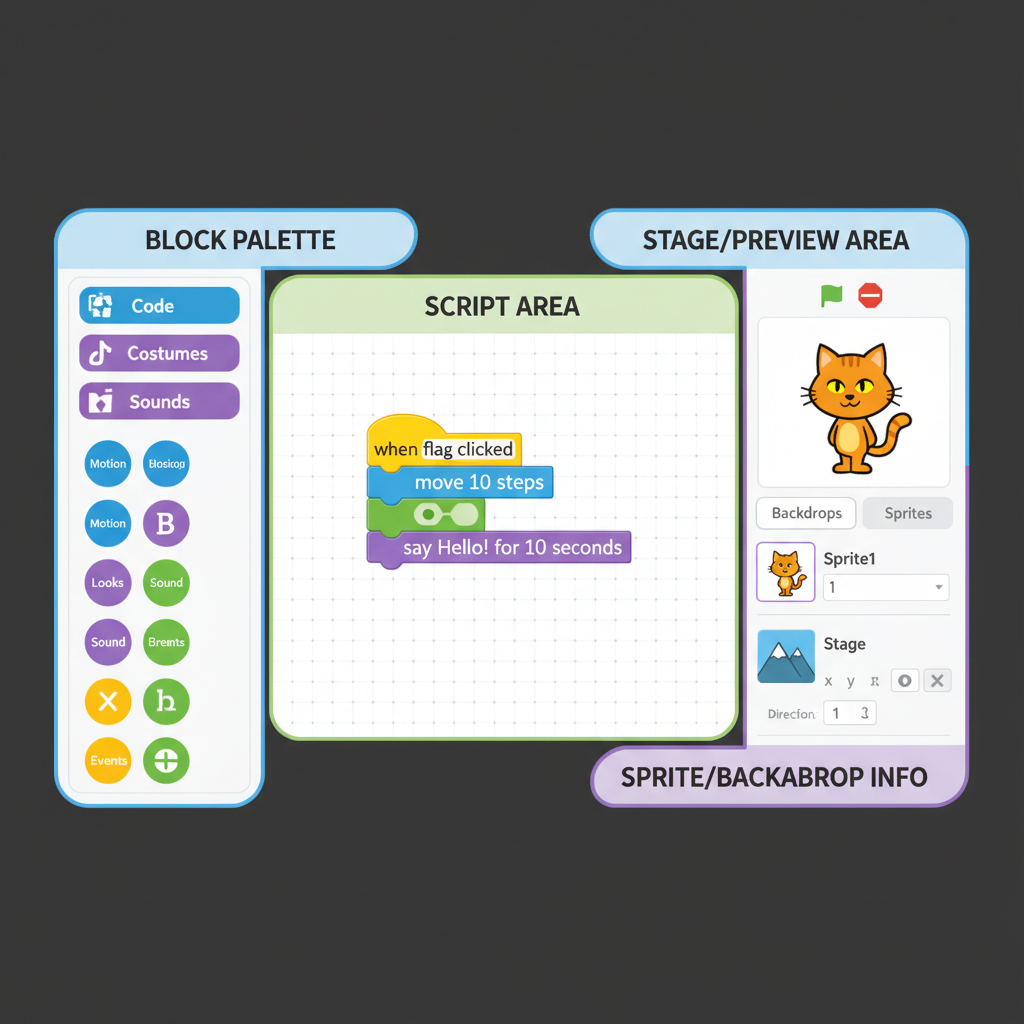
When you first open Scratch, it might look like a lot of different things are happening, but don't worry! We're going to break it down, just like learning the different rooms in a new house. Each part of the Scratch window has a special job.
 ⚠️ This picture may have spelling mistakes. Trust the words in the lesson.
1. The Stage: Where the Magic Happens!
Look at the big white area on the right side of your screen. This is called the Stage. It's like the show stage in a theater, or the playing field in a game. Everything your program does—like your characters moving, talking, or changing scenes—happens right here! When you make a character jump, you'll see it jump on the Stage.
Analogy: The Stage is like the TV screen where you watch your favorite cartoon or video game. It's where you see all the action unfold!
2. Sprites: Your Digital Actors!
Underneath or next to the Stage, you'll see a small picture of a cat. This cat is called a Sprite. Sprites are the characters or objects in your Scratch project. You can have many sprites, like different characters in a story or different items in a game. You can make them move, talk, change how they look, and do all sorts of fun things. The cat is just the default one; you can choose from a library of other sprites or even draw your own!
Analogy: Sprites are like the toy action figures or dolls you play with, or the actors in a play. You give them instructions, and they perform on the Stage.
3. Blocks Palette: Your Toolbox of Instructions!
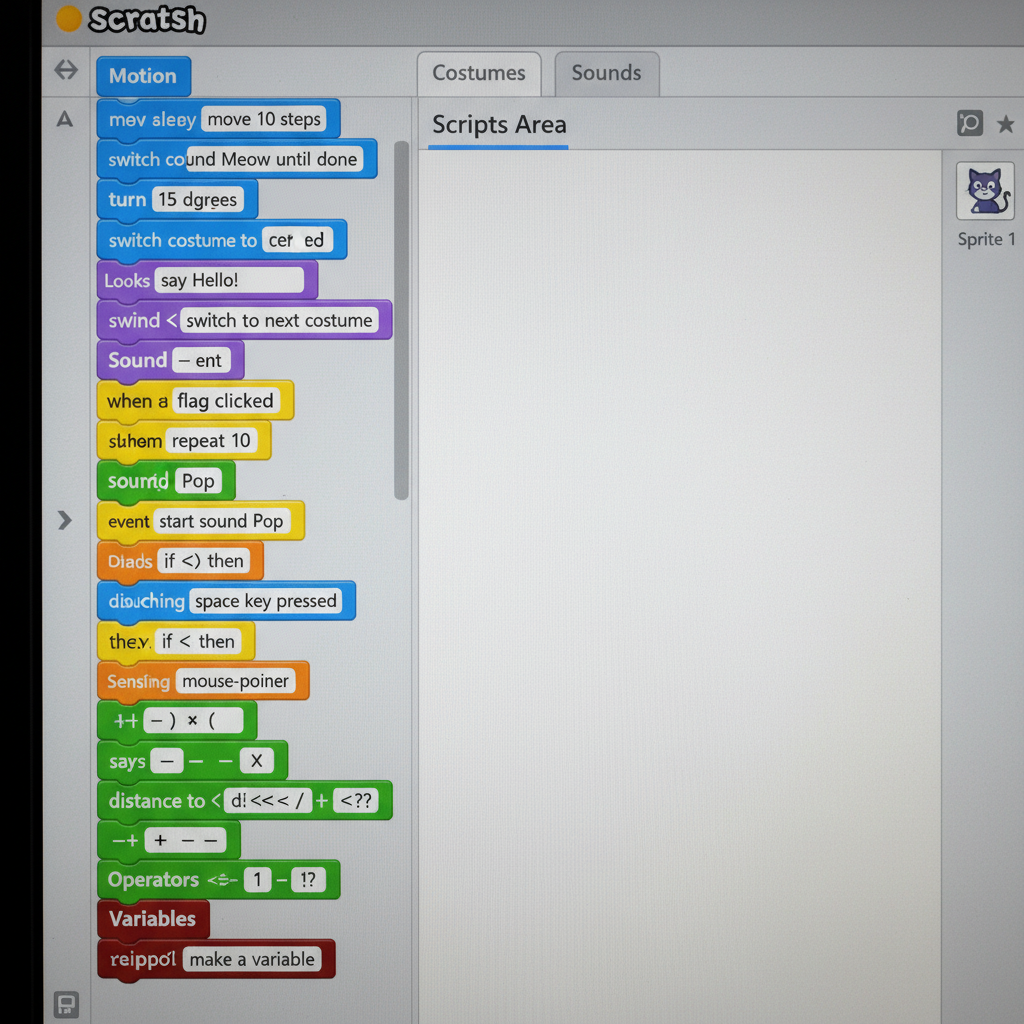
On the left side of the Scratch window, you'll see a column of colorful buttons (like 'Motion,' 'Looks,' 'Sound,' 'Events'). When you click on one of these buttons, a whole bunch of colorful blocks appear next to it. This whole area is called the Blocks Palette. Each block is a single command or instruction you can give to your sprites. For example, the 'Motion' blocks help your sprites move, the 'Looks' blocks help them change how they appear, and 'Sound' blocks let them make noises.
Analogy: The Blocks Palette is like a giant toy box or a toolbox filled with all the different types of tools (blocks) you need. You pick out the right tool for the job you want your sprite to do.
 ⚠️ This picture may have spelling mistakes. Trust the words in the lesson.
4. Scripts Area: Where You Build Your Code!
In the middle of the Scratch window, the big empty space where you drag your blocks is called the Scripts Area. This is your main workspace! You drag blocks from the Blocks Palette and snap them together here, creating a sequence of instructions (a 'script') for your chosen sprite. When you click the green flag button (usually above the Stage), your sprite will follow these instructions, step by step, just like reading a recipe or following a treasure map.
Analogy: The Scripts Area is like your building table or workbench. It's where you actually connect your LEGO pieces (blocks) to build your amazing creation (your code/script) for your toy (sprite) to follow.
Putting It All Together!
So, to recap: You pick a Sprite (your actor), choose commands from the Blocks Palette (your toolbox), snap them together in the Scripts Area (your workbench), and then watch your creation come alive on the Stage (your TV screen)! It's all about experimenting, having fun, and telling your computer what to do, one colorful block at a time. Now you're ready to start building your very own interactive stories and games!
Keep learning, free
Create a free Syllabax account to unlock practice questions and games for this topic.
Visual Learning Enhanced! 🚀
To help you master this topic, we use Advanced Syllabax AI to generate detailed diagrams and visual models.
Note on Visuals: The AI sometimes makes spelling errors in image labels. Please refer to the lesson text for the correct terminology.