Construction based on given parameters (Practical Geometry)
Watch this topic in 60 seconds
Free preview · Lesson 1
Understanding Construction based on given parameters (Practical Geometry)
Mastering Practical Geometry: Building Shapes from Scratch! (Grade 8, Foundational)
Imagine you're an architect designing a new building, or a carpenter crafting a perfect wooden frame. How do they ensure everything is perfectly straight, perfectly square, or perfectly angled? They don't just guess! They use precise tools and methods to construct shapes based on exact measurements and rules. This is the heart of Practical Geometry – learning how to "build" geometric figures accurately using simple tools like a ruler and a compass.
Think of it like following a very precise recipe to bake a cake. If the recipe says "add exactly two cups of flour," you don't just dump in any amount. You measure it precisely. In practical geometry, instead of cups of flour, we're measuring lengths and angles, and instead of a mixing bowl, we're using paper and drawing instruments!
The Essential Toolkit: Your Geometric Superpowers!
Before we start building, let's meet our trusty tools:
- Ruler (or Straightedge): This isn't just for measuring! Its main job in construction is to draw perfectly straight lines. Think of it as your blueprint's straight path maker.
- Compass: This magical tool helps you draw perfect circles and arcs (parts of circles). It's also super useful for transferring lengths without needing to measure them directly with a ruler, and for finding points that are a specific distance from another point. Imagine it as your shape-making robot arm that always draws curves flawlessly.
- Pencil: Your drawing instrument! Keep it sharp for precise lines.
Fundamental Building Blocks: Core Constructions
Just like how you learn to put bricks together before building a wall, we'll start with some fundamental constructions. These are the basic "moves" you'll use over and over again.
1. The Perpendicular Bisector: Slicing Perfectly in Half!
Imagine you have a long sandwich and you want to cut it exactly in half, straight down the middle, so both pieces are equal in length and the cut is perfectly upright. That's what a perpendicular bisector does to a line segment!
- Perpendicular: Means it forms a 90-degree angle (a perfect 'L' shape) with the original line.
- Bisector: Means it divides something into two equal parts.
So, a perpendicular bisector is a line that cuts another line segment into two equal halves, meeting it at a perfect 90-degree angle.
How to Construct a Perpendicular Bisector of a Line Segment AB:
- Draw a line segment AB of any length.
- With A as the center and a radius more than half the length of AB, draw arcs above and below the line segment.
- With B as the center and the same radius as before, draw two more arcs that intersect the first two arcs. Let these intersection points be P and Q.
- Draw a straight line connecting P and Q. This line PQ is the perpendicular bisector of AB.
2. The Angle Bisector: Sharing Pizza Fairly!
Think of an angle as a slice of pizza. If you want to share that slice perfectly fairly with a friend, you'd cut it right down the middle, making two identical, smaller slices. An angle bisector does exactly that: it's a ray that divides an angle into two equal angles.
How to Construct an Angle Bisector of Angle ABC:
- Draw an angle ABC.
- With B (the vertex of the angle) as the center and any convenient radius, draw an arc that intersects both rays BA and BC. Let the intersection points be D and E, respectively.
- With D as the center and a radius more than half the distance DE, draw an arc inside the angle.
- With E as the center and the same radius as before, draw another arc that intersects the previous arc. Let this intersection point be F.
- Draw a ray from B through F. Ray BF is the angle bisector of angle ABC.
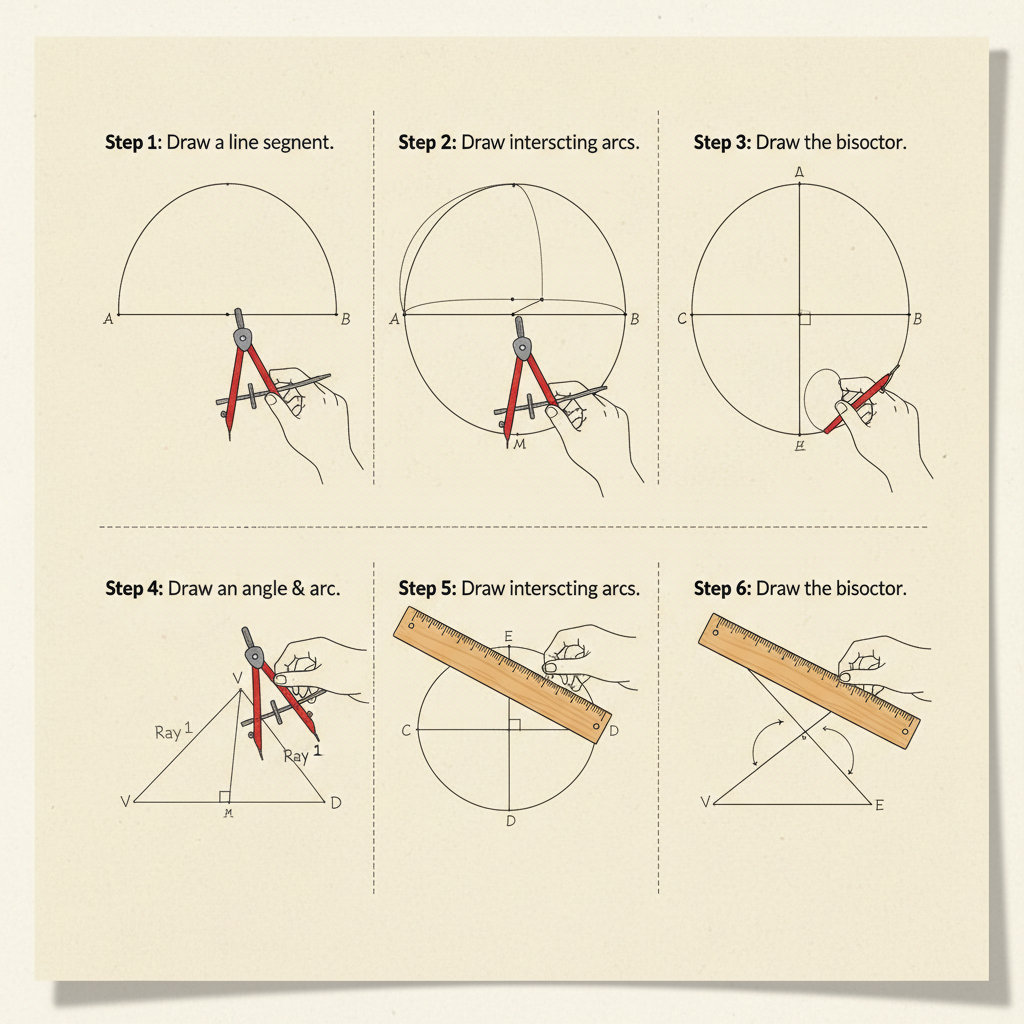 ⚠️ This picture may have spelling mistakes. Trust the words in the lesson.
3. Constructing a Perpendicular Line: Making Perfect Corners!
This is like making sure the wall meets the floor at a perfect right angle, or dropping a plumb line straight down from the ceiling. We'll look at two scenarios:
a) Perpendicular to a Line from a Point ON the Line:
Imagine you have a straight road (a line) and a specific spot on that road where you want to build a flagpole perfectly upright (perpendicular).
- Draw a line 'l' and mark a point P on it.
- With P as the center and any convenient radius, draw arcs that intersect line 'l' on both sides of P. Let these points be A and B. (Now PB = PA)
- With A as the center and a radius more than half of AB, draw an arc above P.
- With B as the center and the same radius, draw another arc intersecting the previous one. Let this point be Q.
- Draw a line from P to Q. Line PQ is perpendicular to line 'l' at point P.
b) Perpendicular to a Line from a Point OUTSIDE the Line:
Imagine you have a straight road (a line) and a house (a point) off to the side. You want to build a path from the house to the road that is the shortest distance, which means it must be perpendicular to the road.
- Draw a line 'l' and mark a point P outside it.
- With P as the center and a radius large enough to intersect line 'l' at two distinct points, draw an arc. Let these intersection points be A and B.
- With A as the center and a radius more than half the distance AB, draw an arc below (or above) the line 'l'.
- With B as the center and the same radius, draw another arc intersecting the previous one. Let this point be Q.
- Draw a line from P to Q. Line PQ is perpendicular to line 'l'.
4. Constructing Parallel Lines: The Train Tracks!
Parallel lines are like train tracks – they run alongside each other, always the same distance apart, and never meet. We often construct parallel lines by using the property of alternate interior angles or corresponding angles being equal when cut by a transversal.
How to Construct a Line Parallel to a Given Line Through a Given Point:
- Draw a line 'l' and mark a point P not on line 'l'.
- Draw a transversal line through P that intersects line 'l' at any point, say Q. (A transversal is a line that cuts across two or more other lines.)
- With Q as the center and any convenient radius, draw an arc that intersects the transversal at R and line 'l' at S.
- With P as the center and the same radius, draw another arc that intersects the transversal at T.
- Measure the arc length from R to S with your compass.
- With T as the center and the radius equal to the arc RS, draw an arc that intersects the arc drawn in step 4. Let this intersection point be U.
- Draw a line through P and U. Line PU is parallel to line 'l'. (Here, we've essentially copied the angle at Q to point P, making corresponding angles equal).
Building Specific Angles: Your Angle Workshop!
Once you know how to bisect angles and draw perpendiculars, you can create many common angles without a protractor!
- Constructing 60°: This is easy! Just draw an equilateral triangle. Each angle in an equilateral triangle is 60°.
- Draw a line segment AB.
- With A as the center and radius AB, draw an arc.
- With B as the center and radius AB, draw another arc intersecting the first arc at C.
- Connect A to C and B to C. Angle CAB (or CBA, or ACB) is 60°.
- Constructing 30°: Bisect a 60° angle!
- Constructing 90°: This is just drawing a perpendicular line from a point on a line.
- Constructing 45°: Bisect a 90° angle!
- Constructing 120°: Draw a 60° angle. Extend one side of the angle to form a straight line. The angle adjacent to the 60° angle on the straight line will be 120° (180° - 60°). Alternatively, you can make two 60° angles adjacent to each other.
Constructing Quadrilaterals: From Basic Shapes to Complex Designs!
Now, let's put these building blocks together to create some specific quadrilaterals (four-sided shapes)! Remember, each quadrilateral has unique properties that guide its construction.
1. Constructing a Square (Given a side length 's'):
A square has four equal sides and four 90-degree angles.
- Draw a line segment AB of length 's'.
- At point A, construct a perpendicular line segment AX (this will be 90°).
- Open your compass to length 's'. With A as the center, draw an arc that intersects AX at D. (Now AD = s)
- With D as the center and radius 's', draw an arc.
- With B as the center and radius 's', draw another arc that intersects the arc from step 4. Let this point be C.
- Connect B to C and C to D. ABCD is your square!
2. Constructing a Rectangle (Given length 'l' and width 'w'):
A rectangle has opposite sides equal and parallel, and four 90-degree angles.
- Draw a line segment AB of length 'l'.
- At point A, construct a perpendicular line segment AX.
- Open your compass to length 'w'. With A as the center, draw an arc that intersects AX at D. (Now AD = w)
- At point B, construct a perpendicular line segment BY.
- Open your compass to length 'w'. With B as the center, draw an arc that intersects BY at C. (Now BC = w)
- Connect D to C. ABCD is your rectangle!
3. Constructing a Parallelogram (Given two adjacent sides and an included angle):
A parallelogram has opposite sides equal and parallel, and opposite angles equal.
- Draw a line segment AB, one of the given side lengths.
- At point A, construct the given angle (e.g., 60°). Let the ray be AX.
- Open your compass to the length of the other given adjacent side. With A as the center, draw an arc that intersects AX at D. (AD is the second side)
- Now, to find C: Open your compass to length AB. With D as the center, draw an arc.
- Open your compass to length AD. With B as the center, draw another arc that intersects the arc from step 4. Let this point be C.
- Connect B to C and D to C. ABCD is your parallelogram!
4. Constructing a Rhombus (Given one side length and one angle):
A rhombus is a parallelogram with all four sides equal. So, the steps are very similar to a parallelogram, but all 'side' lengths will be the same.
- Draw a line segment AB, the given side length.
- At point A, construct the given angle. Let the ray be AX.
- Open your compass to the side length AB. With A as the center, draw an arc that intersects AX at D. (AD = AB)
- With D as the center and radius AB, draw an arc.
- With B as the center and radius AB, draw another arc that intersects the arc from step 4. Let this point be C.
- Connect B to C and D to C. ABCD is your rhombus!
Why is this important? The Real-World Connection!
Practical geometry isn't just about drawing pretty shapes on paper. It's a foundational skill for countless professions and everyday situations:
- Architecture and Construction: Architects use these principles to draw accurate blueprints, and builders use them to ensure walls are straight, corners are square, and roofs have the correct pitch.
- Engineering: From designing bridges and cars to electronic circuits, engineers rely on precise geometric constructions for functionality and safety.
- Art and Design: Artists use geometric principles for perspective, proportion, and creating balanced compositions. Graphic designers use them for precise layouts and patterns.
- Crafts and DIY: Whether you're making a quilt, building a bookshelf, or designing a garden, understanding how to construct accurate angles and lines is crucial.
Think of practical geometry as learning the alphabet of shapes. Once you know the alphabet, you can write words, then sentences, and eventually entire books! These basic constructions are your alphabet, allowing you to build increasingly complex and beautiful geometric designs with accuracy and confidence.
So grab your compass and ruler, and get ready to become a master builder of the geometric world!
Keep learning, free
Create a free Syllabax account to unlock practice questions and games for this topic.
Visual Learning Enhanced! 🚀
To help you master this topic, we use Advanced Syllabax AI to generate detailed diagrams and visual models.
Note on Visuals: The AI sometimes makes spelling errors in image labels. Please refer to the lesson text for the correct terminology.