Learning Journey
Watch this topic in 60 seconds
Free preview · Lesson 1
Understanding Spherical mirrors & ray diagrams[PHYSICS]
Unveiling the Magic of Spherical Mirrors & Ray Diagrams
Welcome to the fascinating world of light and reflection! In our everyday lives, we encounter mirrors constantly. From checking our appearance in a bathroom mirror to seeing cars behind us in a rearview mirror, mirrors play a crucial role. But have you ever stopped to think about how they work, especially the curved ones?
Today, we're going to dive deep into a special type of mirror called a spherical mirror. Imagine taking a giant, shiny, hollow ball, like a polished Christmas ornament or a perfectly round bowling ball, and then cutting out a piece from its surface. That piece, when polished, forms a spherical mirror! Unlike flat (plane) mirrors, spherical mirrors can do some amazing things with light, like making objects appear bigger, smaller, or even upside down!
1. What are Spherical Mirrors?
A spherical mirror, as the name suggests, is a mirror whose reflective surface is part of a sphere. Think of it like a slice from a shiny, hollow ball. There are two main types, depending on which side of the 'slice' is reflective:
A. Concave Mirrors: The 'Gathering' Mirror
Imagine holding a shiny soup spoon. If you look at your reflection on the inside curve of the spoon, you're looking at a concave mirror! The reflecting surface of a concave mirror curves inwards, like the inside of a cave. Because of this shape, concave mirrors tend to converge or gather parallel rays of light to a single point. Think of it like a funnel for light, bringing it all together.
B. Convex Mirrors: The 'Spreading' Mirror
Now, flip that shiny soup spoon over and look at your reflection on the outside, bulging curve. That's a convex mirror! The reflecting surface of a convex mirror curves outwards. Unlike concave mirrors, convex mirrors tend to diverge or spread out parallel rays of light. They make things look smaller and cover a wider area, much like how security mirrors in shops allow shopkeepers to see a broad view of the store.
2. Key Terms for Understanding Spherical Mirrors
Before we start drawing light rays, we need to understand some important vocabulary. These terms help us precisely describe spherical mirrors and where light interacts with them.
- Pole (P): This is the exact center of the reflecting surface of the spherical mirror. Imagine it as the bullseye or the middle point of your 'slice' of the sphere.
- Center of Curvature (C): This is the center of the original imaginary sphere from which the mirror was cut. Think of it as the very middle of the giant ball your mirror came from. For a concave mirror, C is in front of the mirror. For a convex mirror, C is behind the mirror.
- Radius of Curvature (R): This is the distance between the Pole (P) and the Center of Curvature (C). It's essentially the radius of the imaginary sphere.
- Principal Axis: This is an imaginary straight line passing through the Pole (P) and the Center of Curvature (C). It's like the main highway or the central guiding line for our light rays.
- Principal Focus (F) or Focal Point: This is a very special point. For a concave mirror, all light rays parallel to the principal axis, after reflection, actually meet at this point. For a convex mirror, parallel light rays appear to spread out from this point behind the mirror. It's often called the 'sweet spot' for light.
- Focal Length (f): This is the distance between the Pole (P) and the Principal Focus (F). It's half of the radius of curvature, meaning f = R/2.
Here's an analogy to cement these terms: Imagine you're standing on a perfectly round, polished dome (convex) or inside a perfectly round cave (concave). The very center of the dome/cave's base is the Pole (P). The exact center of the imaginary giant ball that forms the dome/cave is the Center of Curvature (C). The straight line from P to C is the Principal Axis. And the special point where sunlight might gather (in a concave cave) or appear to come from (on a convex dome) is the Focus (F).
3. Ray Diagrams: Mapping the Path of Light
Ray diagrams are like roadmaps for light rays. They are simple drawings that use a few special rules to show how light rays behave when they hit a spherical mirror, helping us predict where an image will form and what it will look like. We typically draw at least two (and usually three) principal rays to locate the image.
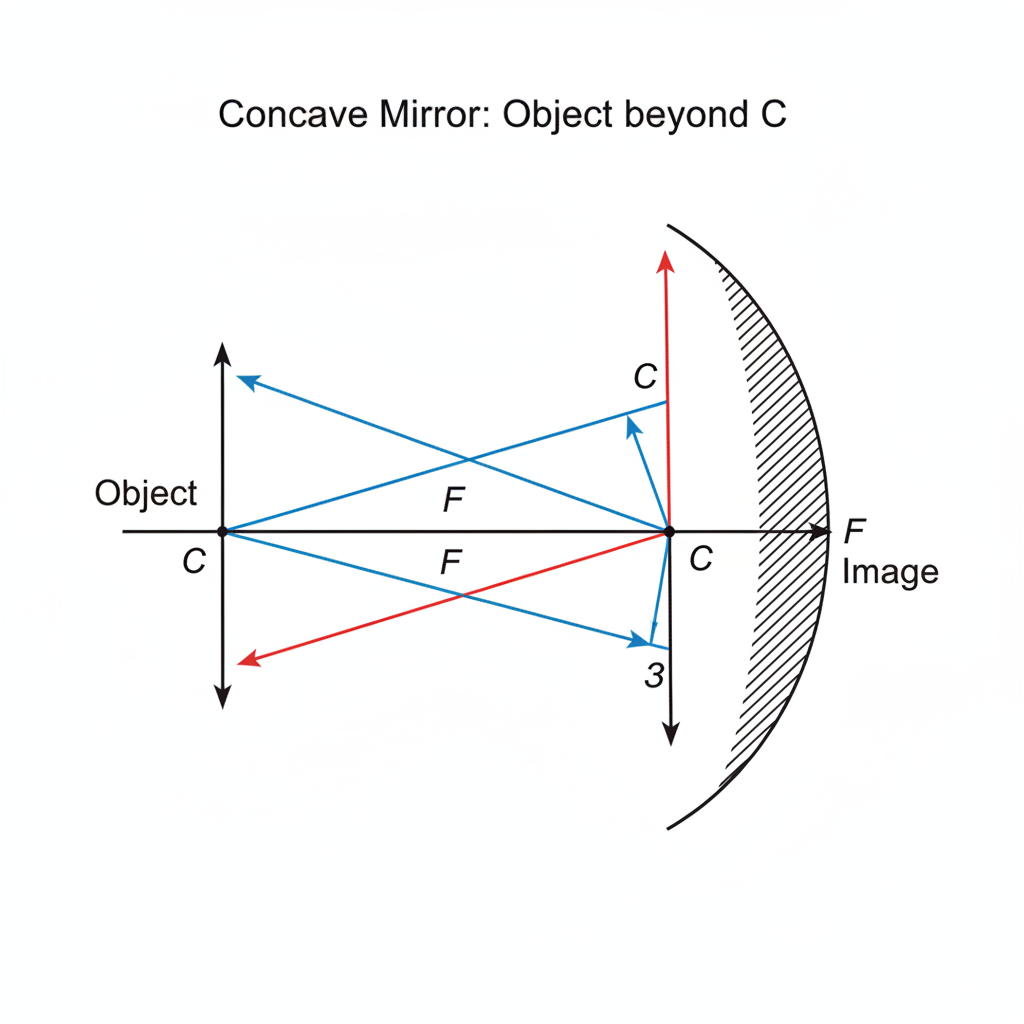 ⚠️ This picture may have spelling mistakes. Trust the words in the lesson.
A. Ray Diagram Rules for Concave Mirrors (Converging)
Remember, concave mirrors bring light together. Here are the three main rays we use:
- Rule 1: Any ray of light travelling parallel to the principal axis, after reflection, will pass through the Principal Focus (F). Analogy: Imagine cars driving straight on a highway (parallel to the principal axis). After hitting a special reflective wall (the mirror), they all get directed to one specific exit ramp (the focus).
- Rule 2: Any ray of light passing through the Principal Focus (F), after reflection, will travel parallel to the principal axis. Analogy: It's the reverse! Cars coming from that special exit ramp (focus), after hitting the reflective wall, get straightened out onto the highway, parallel to the principal axis.
- Rule 3: Any ray of light passing through the Center of Curvature (C), after reflection, will retrace its own path (i.e., pass back through C). Analogy: Imagine a ball thrown directly at the center of a curved wall. It will bounce straight back along the same path. This is because the ray is hitting the mirror surface perpendicularly.
Image Formation with Concave Mirrors: The type of image formed by a concave mirror depends heavily on where the object is placed relative to F and C. Concave mirrors are very versatile!
- Object Beyond C: Image is formed between F and C, real, inverted, and diminished (smaller).
- Object At C: Image is formed at C, real, inverted, and same size.
- Object Between C and F: Image is formed beyond C, real, inverted, and magnified (larger).
- Object At F: Rays become parallel after reflection, so the image is formed at infinity (or not formed at a specific point).
- Object Between F and P: Image is formed behind the mirror, virtual, erect (upright), and magnified. (This is how shaving mirrors or make-up mirrors work – they make your face look bigger!).
B. Ray Diagram Rules for Convex Mirrors (Diverging)
Convex mirrors spread light out. The Center of Curvature (C) and Principal Focus (F) are located behind the mirror (they are virtual points, not actual points where light converges).
- Rule 1: Any ray of light travelling parallel to the principal axis, after reflection, will appear to diverge (spread out) from the Principal Focus (F) behind the mirror. Analogy: Cars on the highway hit the curved mirror and get scattered. If you trace their paths backward, they all seem to come from one point behind the mirror.
- Rule 2: Any ray of light directed towards the Principal Focus (F) behind the mirror, after reflection, will travel parallel to the principal axis. Analogy: If you aim a car towards a specific point behind the curved wall, it will bounce off and drive straight onto the highway.
- Rule 3: Any ray of light directed towards the Center of Curvature (C) behind the mirror, after reflection, will retrace its own path. Analogy: Same as concave, if you aim at the 'center' point, it bounces back.
Image Formation with Convex Mirrors: Convex mirrors are much simpler! They always form only one type of image, regardless of where the object is placed (as long as it's in front of the mirror):
- Image is always formed between P and F, behind the mirror.
- Image is always Virtual: Meaning it cannot be projected onto a screen. It's an illusion.
- Image is always Erect: Meaning it's upright, not upside down.
- Image is always Diminished: Meaning it's smaller than the actual object.
Analogy: Think of a car's side-view mirror (which is usually convex). Objects in it always appear smaller and upright, allowing the driver to see a wider area behind the car. This wide field of view is a key advantage!
4. Real-World Applications
- Concave Mirrors:
- Shaving/Makeup Mirrors: When you place your face close (between F and P), it produces a magnified, erect image.
- Headlights of Cars & Searchlights: A light bulb placed at the focus (F) of a concave mirror produces a powerful, parallel beam of light.
- Astronomical Telescopes: Used to gather light from distant stars.
- Dentist's Mirror: To see magnified images of teeth.
- Convex Mirrors:
- Rear-view Mirrors in Vehicles: Provide a wide field of view, showing many vehicles behind, although they appear smaller.
- Security Mirrors in Stores: Allow surveillance over a large area.
- Street Light Reflectors: To diverge light over a wider area.
Understanding spherical mirrors and how to draw their ray diagrams is like having a superpower to predict how light will behave. It's a foundational concept in optics that helps us appreciate the design of everything from our simple mirrors to complex telescopes and cameras!
Keep learning, free
Create a free Syllabax account to unlock practice questions and games for this topic.
Visual Learning Enhanced! 🚀
To help you master this topic, we use Advanced Syllabax AI to generate detailed diagrams and visual models.
Note on Visuals: The AI sometimes makes spelling errors in image labels. Please refer to the lesson text for the correct terminology.