Frustum of a cone (intro conceptual) (Surface Area & Volume)
Watch this topic in 60 seconds
Free preview · Lesson 1
Understanding Frustum of a cone (intro conceptual) (Surface Area & Volume)
Understanding the Frustum of a Cone: A Conceptual Journey
Welcome, 10th graders! Today, we're going to dive into a fascinating 3D shape called a frustum of a cone. Don't let the name intimidate you; it's a shape you've likely seen many times in everyday life! Our goal is to understand what a frustum is, how it's formed, and its basic components, laying the groundwork for future calculations of its surface area and volume.
What is a Cone, Anyway? (A Quick Recap)
Before we tackle a frustum, let's quickly remember its parent shape: the cone. Imagine a birthday hat, an ice cream cone, or a traffic cone. What do these have in common? They all have a circular base and taper smoothly to a single point at the top, called the apex. Think of it like a triangular prism with a circular base instead of a polygonal one.
Key parts of a cone:
- Base: The circular bottom.
- Radius (r): The distance from the center of the base to its edge.
- Height (h): The perpendicular distance from the center of the base to the apex.
- Slant Height (l): The distance from the edge of the base to the apex along the curved surface.
Introducing the Frustum of a Cone: What Happens When You Slice a Cone?
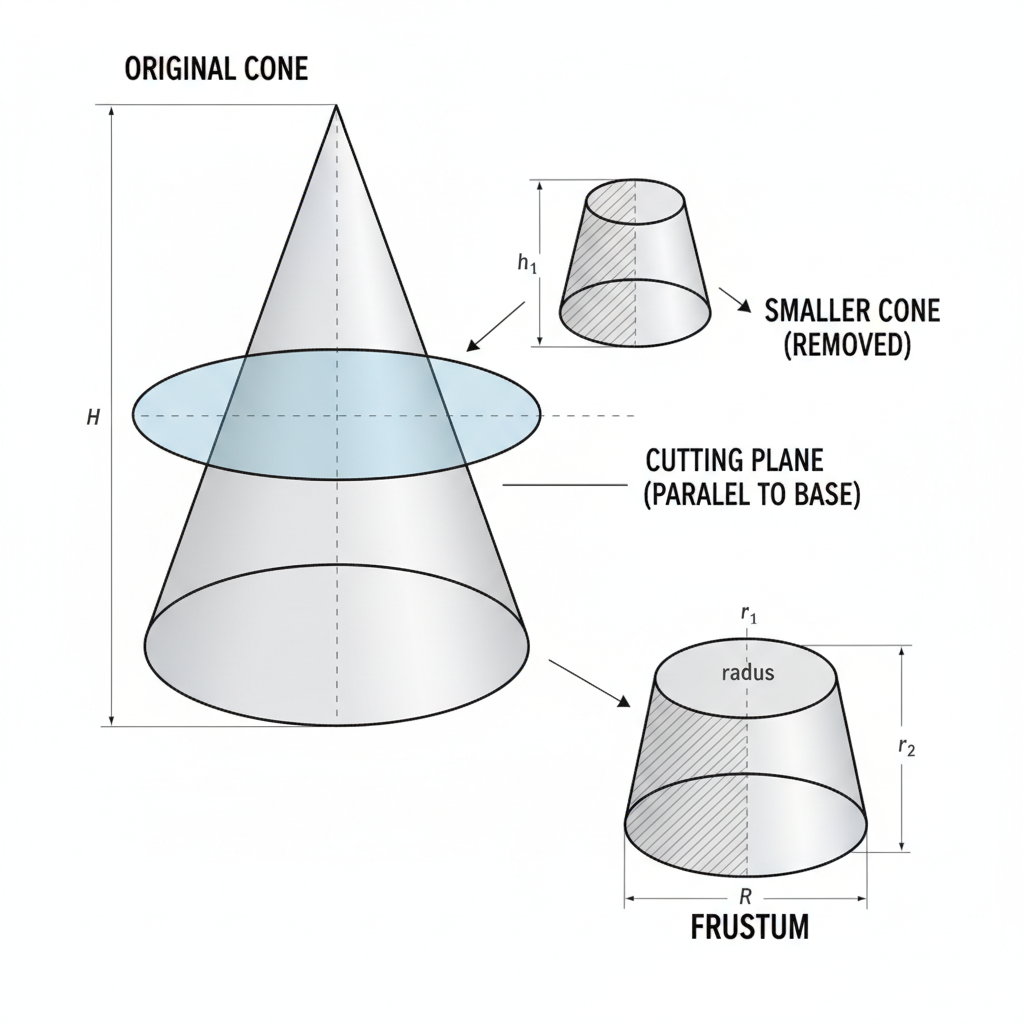
Now, imagine you have a perfect ice cream cone. What if you took a knife and sliced off the very top, parallel to the base? The part that's left – the bigger, bottom part with two circular openings – that's a frustum of a cone!
Think of it like this:
- Start with a full cone.
- Make a cut: Slice the cone with a plane that is parallel to its base.
- Remove the top part: Discard the smaller cone that you cut off from the top.
- What's left? The remaining part is the frustum! It looks like a cone with its pointy top chopped off.
Analogy Time!
- A Bucket: When you look at a typical bucket, especially one used for carrying water, it's often wider at the top and narrower at the bottom, with flat circular bases. That's a frustum!
- A Lampshade: Many lampshades are perfect examples of a frustum. They have a wider circle at the bottom and a smaller circle at the top, allowing light to spread out.
- A Drinking Glass (some types): Certain glasses that are wider at the rim and narrower at the base also have the shape of a frustum.
- A Funnel (the main body): The main body of a large funnel, before it narrows into a thin spout, is often a frustum.
Key Components of a Frustum of a Cone
Since a frustum is essentially a 'chopped' cone, it shares some features but also has its own unique characteristics. Let's look at its essential parts:
- Two Circular Bases: Unlike a cone with one base, a frustum has two! One is the original base of the larger cone (the bottom), and the other is the circular cross-section created by the cut (the top). These two bases are always parallel to each other.
- Two Radii: Because there are two circular bases, there are two different radii:
- Larger Radius (R): The radius of the bottom (larger) circular base.
- Smaller Radius (r): The radius of the top (smaller) circular base.
- Height (h): This is the perpendicular distance between the centers of the two circular bases. It's the 'straight up and down' measurement of the frustum itself.
- Slant Height (l): This is the distance along the curved surface of the frustum, measured from a point on the circumference of the larger base to a corresponding point on the circumference of the smaller base. Think of it as the length of the 'slanted wall' of your bucket or lampshade.
It's crucial to understand that the height and slant height are different. The height goes straight through the center, while the slant height goes along the edge of the curved surface.
Conceptualizing Surface Area of a Frustum
Imagine you wanted to paint the outside of a frustum-shaped bucket. What parts would you paint?
- The Bottom: This is a circle. Its area would be πR².
- The Top: This is also a circle, but smaller. Its area would be πr².
- The Curved Surface (Lateral Surface Area): This is the tricky part! If you could 'unroll' the curved surface of a frustum, it wouldn't be a simple rectangle like a cylinder. Instead, it would look somewhat like a trapezoid with curved sides. It's the area of the 'walls' of the frustum.
So, the total surface area of a frustum is the sum of the areas of its two circular bases and its curved lateral surface. For now, just understand *what* surfaces make up the total area, not the specific formulas.
Conceptualizing Volume of a Frustum
Now, what if you wanted to fill that frustum-shaped bucket with water? How much water would it hold? That's its volume.
Think back to how we formed the frustum: by cutting a small cone off a larger cone. So, if you want the volume of the frustum, you can simply do this:
Volume of Frustum = Volume of the Original Large Cone - Volume of the Small Cone that was Cut Off
This is a powerful conceptual idea! It shows that even complex shapes can sometimes be understood by breaking them down into simpler components. The volume represents the amount of space the frustum occupies.
Putting It All Together
A frustum of a cone is a 3D shape formed by slicing off the top of a cone parallel to its base. It has two parallel circular bases (one larger, one smaller) with corresponding radii (R and r), a height (h) between the bases, and a slant height (l) along its curved surface. Understanding these fundamental ideas and how the frustum relates to a full cone is your first and most important step in mastering this interesting geometric figure!
Keep learning, free
Create a free Syllabax account to unlock practice questions and games for this topic.
Visual Learning Enhanced! 🚀
To help you master this topic, we use Advanced Syllabax AI to generate detailed diagrams and visual models.
Note on Visuals: The AI sometimes makes spelling errors in image labels. Please refer to the lesson text for the correct terminology.