Right-hand thumb rule[PHYSICS]
Watch this topic in 60 seconds
Free preview · Lesson 1
Understanding Right-hand thumb rule[PHYSICS]
Mastering the Right-Hand Thumb Rule: A 10th Grade Guide to Magnetic Fields
Have you ever played with magnets? You know how they push and pull each other even without touching? That invisible area around a magnet where its force is felt is called a magnetic field. But what if I told you that electricity can also create its own magnetic fields? This amazing connection between electricity and magnetism is called electromagnetism, and it's super important in everything from electric motors to MRI machines!
Today, we're going to unlock one of the fundamental secrets of electromagnetism: the Right-Hand Thumb Rule. This rule is like a secret decoder ring that helps us figure out the direction of the magnetic field created by a current flowing through a wire. It might sound a bit fancy, but trust me, it's as simple as giving a thumbs-up!
What is a Magnetic Field, Anyway?
Imagine a giant invisible cloud around a magnet. Anything magnetic that enters this cloud will feel a push or a pull. That's a magnetic field. When electric current flows through a wire, it doesn't just produce heat and light; it also creates its own magnetic field around the wire. This discovery was revolutionary and paved the way for modern technology.
Why Do We Need a Rule?
Knowing that a magnetic field exists is one thing, but knowing its direction is crucial. Think about trying to navigate a ship without knowing which way is north. You'd be lost! Similarly, engineers and scientists need to know the direction of magnetic fields to design and understand electrical devices. That's where our handy Right-Hand Thumb Rule comes in!
The Right-Hand Thumb Rule: Your Magnetic Compass!
Let's get straight to the rule. It's incredibly straightforward and uses just one of your hands – your right hand, of course!
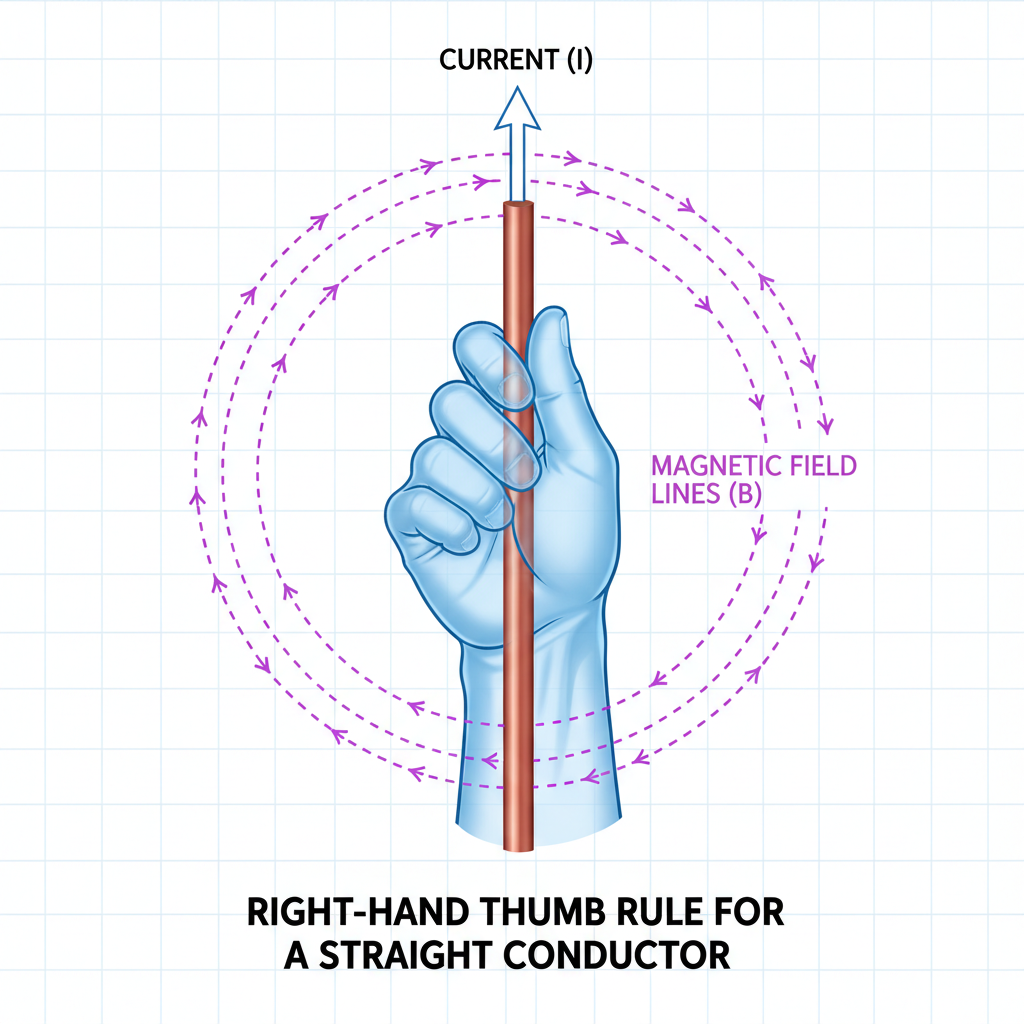
- Imagine a Wire: Picture a straight wire through which electric current is flowing.
- Grab the Wire (in your imagination!): Now, imagine you're grasping this wire with your right hand. Don't actually touch live wires, this is just for visualization!
- Point Your Thumb: The most important part! Your thumb should point in the direction of the electric current. If the current is flowing upwards, point your thumb up. If it's flowing downwards, point your thumb down.
- Curl Your Fingers: Now, naturally curl your other four fingers around the imaginary wire. The direction in which your fingers curl tells you the direction of the magnetic field lines around the wire.
It's that simple! Your thumb shows the current, and your curling fingers show the magnetic field.
Analogies to Help You Remember:
Sometimes, analogies can make complex ideas super easy to grasp. Here are a few:
- The Screwdriver Analogy: Imagine you're using a screwdriver. When you turn the screwdriver (your fingers curling) to screw something in or out, the screw (your thumb) moves forward or backward. If your thumb points in the direction of the current, your curling fingers show the way the magnetic field 'turns' around it.
- The Tornado Analogy: Think about a tornado. The central 'eye' of the tornado moves in a certain direction (like your thumb, the current), while the wind swirls powerfully around it in a specific direction (like your curling fingers, the magnetic field).
- The Water Swirl Analogy: If you pull the plug from a sink full of water, the water drains away (the current, your thumb) and simultaneously swirls in a particular direction (the magnetic field, your fingers).
- The Corkscrew Analogy: A corkscrew is a classic! If you push the corkscrew into a cork (the direction of current, your thumb), you have to twist it (the direction of magnetic field, your fingers) to make it go in.
What Do Magnetic Field Lines Look Like?
For a straight current-carrying wire, the magnetic field lines are concentric circles. Imagine a target or ripples in a pond, with the wire right at the center. These circles become weaker the further you get from the wire, just like ripples fading out.
The Right-Hand Thumb Rule helps us determine the direction of these circles. Are they clockwise? Or counter-clockwise? Your curling fingers will tell you!
- Example 1: Current Upwards
If you point your right thumb upwards, your fingers will curl in a counter-clockwise direction (when viewed from above the wire). So, the magnetic field lines will be counter-clockwise circles. - Example 2: Current Downwards
If you point your right thumb downwards, your fingers will curl in a clockwise direction (when viewed from above the wire). So, the magnetic field lines will be clockwise circles.
Why is This Rule a Big Deal?
The Right-Hand Thumb Rule is more than just a classroom exercise; it's a foundational concept in physics with countless real-world applications:
- Electromagnets: By wrapping a wire into a coil, we can create a much stronger magnetic field. Understanding the direction of the field from each part of the wire (using our rule!) helps design powerful electromagnets used in scrap yards, doorbells, and even maglev trains.
- Electric Motors: Motors work by using magnetic fields to create motion. Knowing the direction of these fields is essential for designing motors that spin in the correct direction.
- Generators: Generators do the opposite of motors; they use motion to create electricity. Again, the principles of electromagnetism, guided by rules like the Right-Hand Thumb Rule, are fundamental to their operation.
- Circuit Design: When designing complex electronic circuits, engineers need to consider how magnetic fields created by different wires might interact and interfere with each other.
Bringing It All Together
The Right-Hand Thumb Rule is a simple yet powerful tool for understanding the invisible world of magnetic fields created by electric currents. Remember: Thumb points to Current, Fingers curl to Magnetic Field. With this rule in your toolbox, you've taken a significant step in understanding the fascinating interplay between electricity and magnetism, a cornerstone of modern technology!
Keep learning, free
Create a free Syllabax account to unlock practice questions and games for this topic.
Visual Learning Enhanced! 🚀
To help you master this topic, we use Advanced Syllabax AI to generate detailed diagrams and visual models.
Note on Visuals: The AI sometimes makes spelling errors in image labels. Please refer to the lesson text for the correct terminology.