Block Coding with Scratch
Watch this topic in 60 seconds
Free preview · Lesson 1
Understanding Block Coding with Scratch
Welcome to Block Coding with Scratch!
Hey there, future game designers and storytellers! Have you ever wondered how your favorite video games are made, or how animated movies come to life? Well, a big part of it is something called coding. Coding is like giving instructions to a computer to make it do what you want.
But don't worry, we're not going to start with complicated text that looks like a secret spy language! We're going to dive into a super fun and easy way to learn coding called Block Coding, using an amazing tool called Scratch!
What is Block Coding?
Imagine you have a big box of LEGO bricks. Each brick has a special shape and can be snapped together with other bricks. When you snap them together, you can build anything from a simple car to a giant castle, right?
Block coding is just like building with LEGO bricks, but instead of physical bricks, you're using colorful digital 'code blocks' on your computer screen. Each block has a specific job, and when you snap them together, you create a sequence of instructions that tell your computer what to do!
Scratch is a free, visual programming language developed by MIT. It's designed specifically for kids like you to create interactive stories, games, and animations without having to type out complex code. It's all about dragging and dropping those colorful blocks!
Why Scratch is So Cool!
- It's Visual: You can see exactly what your code blocks do. No more guessing games!
- It's Creative: You can make anything you imagine – your own cartoons, puzzles, or even a dance party with talking animals!
- It's Easy to Learn: Because it uses blocks, you don't have to worry about typos or difficult syntax. Just snap and go!
- It's Fun: It feels more like playing a game than doing homework.
Exploring the Scratch World: The Main Parts
When you open Scratch, you'll see a colorful screen with different sections. Let's break them down, like exploring different rooms in a cool clubhouse:
1. The Stage (Where the Magic Happens)
This is the big white area on the right side of the screen. It's where your creations come to life! Whatever you program your characters to do – move, talk, dance – you'll see it all happening right here.
Think of the Stage as a theater stage, where all the actors perform their scenes for an audience.
2. Sprites (Your Characters and Objects)
A Sprite is any character or object that you can program in Scratch. The default sprite is a cute orange cat, but you can choose from hundreds of other sprites, or even draw your own!
Sprites are like the actors or characters in your play. Each actor can be given different lines to say and different actions to perform.
3. Backdrops (The Scenery)
The Backdrop is the background for your Stage. You can have a snowy forest, a bustling city, outer space, or anything you can imagine! You can even change backdrops during your project.
Backdrops are like the scenery on the theater stage. They set the mood and location for your story.
4. Block Palettes (Your Toolbox of Commands)
On the left side of the screen, you'll see columns of colorful blocks grouped by category (like Motion, Looks, Sound, Events, Control). This area is called the Block Palettes.
Think of the Block Palettes as your ultimate toolbox, where each drawer contains different types of tools. The blue drawer has all your 'moving' tools, the purple drawer has all your 'talking' and 'looking' tools, and so on.
5. Scripts Area (Where You Build Your Code)
This is the large empty area in the middle of the screen. This is where you drag blocks from the Block Palettes and snap them together to build your code! When you snap blocks together, you create a script, which is a set of instructions for a sprite or the stage.
The Scripts Area is like your recipe card or your blueprint. It's where you write down the step-by-step instructions for what you want your actors (sprites) to do.
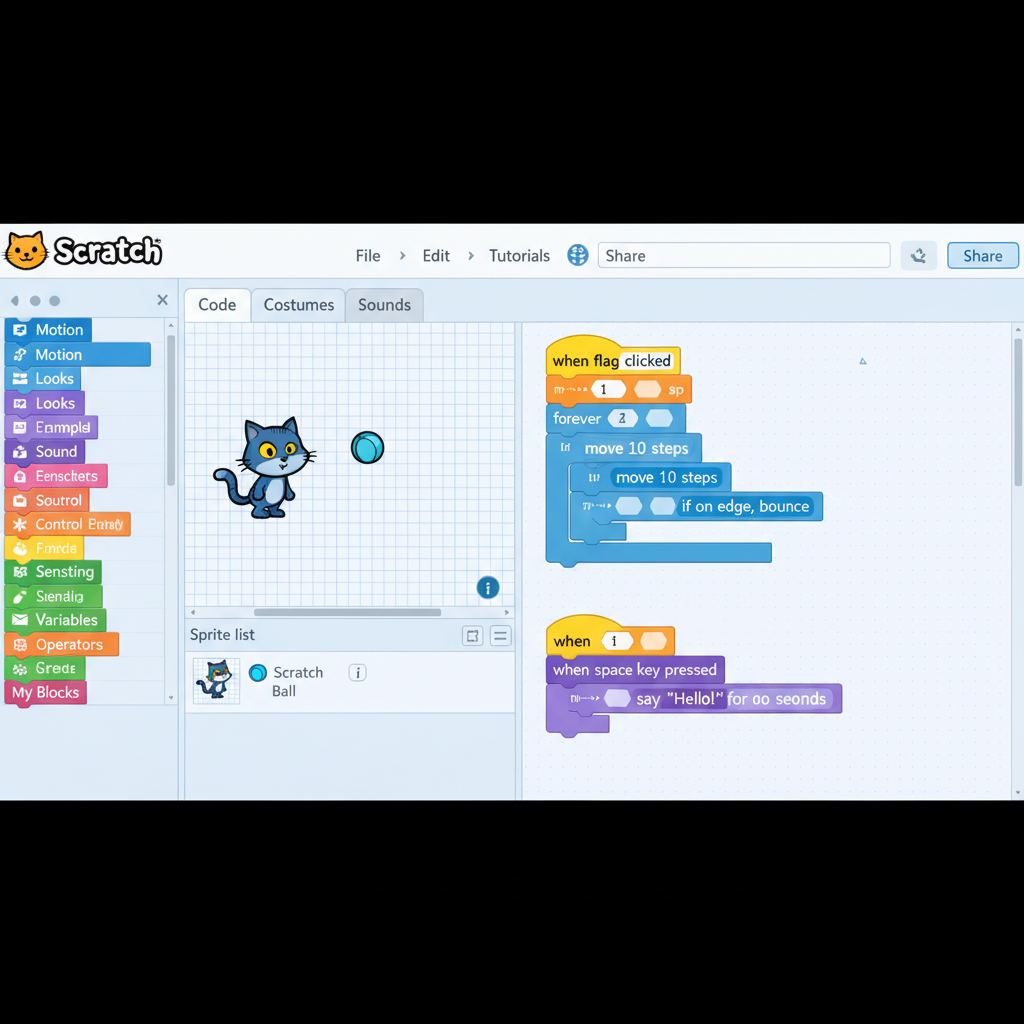 ⚠️ This picture may have spelling mistakes. Trust the words in the lesson.
6. Green Flag and Stop Button (Play and Pause)
At the top of the Stage, you'll see a green flag and a red stop sign. Clicking the Green Flag is like pressing 'play' – it starts your project! Clicking the Stop Button does exactly that – it stops everything.
These are just like the play and stop buttons on a remote control for a video game or a movie. The green flag gets the show started!
Basic Types of Blocks: Your First Commands!
Let's look at some common block categories you'll use all the time:
-
Motion Blocks (Blue): These blocks make your sprites move! You can make them move 10 steps, turn right, turn left, go to a specific spot, or even glide smoothly.
These are like giving directions to your character: "Take 10 steps forward! Turn right!"
-
Looks Blocks (Purple): These blocks control how your sprites look and what they say or think. You can make them say "Hello!", think "Hmm...", change their size, hide or show them, or even switch to a different 'costume' (different appearance).
These are like dressing up your actors, giving them speech bubbles, or making them disappear and reappear on stage!
-
Sound Blocks (Pink): Want to add music or sound effects? These blocks are for you! You can play a meow sound, record your own voice, or play a musical note.
These are like being the DJ for your project, adding background music or exciting sound effects!
-
Events Blocks (Yellow): These are super important because they start your scripts! Common ones are "when green flag clicked" (to start your entire project), "when space key pressed," or "when this sprite clicked."
Events blocks are like the 'trigger' or 'start button' for a specific action. You click the green flag, and BAM! Your game begins!
-
Control Blocks (Orange): These blocks help you control the flow of your program. You can make a sprite wait for a few seconds, repeat an action many times, or even make decisions with 'if/then' blocks.
Control blocks are like the director of your play, telling the actors when to wait, when to repeat a line, or making sure something only happens 'if' a certain condition is met.
Your Very First Script Idea: Make the Cat Say Hello and Move!
Let's try a simple example. Imagine we want the Scratch Cat to say "Hello, Coder!" and then move a little bit when we click the green flag.
- Go to the Events palette (yellow) and drag out the
when green flag clickedblock to the Scripts Area. This is your starting point! - Go to the Looks palette (purple) and drag out the
say "Hello!" for 2 secondsblock. Snap it right underneath the yellow block. Change "Hello!" to "Hello, Coder!". - Go to the Motion palette (blue) and drag out the
move 10 stepsblock. Snap it underneath the "say" block. - Now, click the green flag above the Stage! What happens? The cat says hello and moves a little!
You just wrote your first program! The order you snap the blocks matters, just like the order of steps in a recipe. If you put the 'move' block first, the cat would move then say hello.
Keep Exploring and Experimenting!
The best way to learn Scratch is to play around with it! Try snapping different blocks together, changing numbers, and seeing what happens. Don't be afraid to make mistakes – that's how you learn!
Scratch is a powerful tool for bringing your ideas to life. You can create anything from simple animations to complex games. The only limit is your imagination!
Keep learning, free
Create a free Syllabax account to unlock practice questions and games for this topic.
Visual Learning Enhanced! 🚀
To help you master this topic, we use Advanced Syllabax AI to generate detailed diagrams and visual models.
Note on Visuals: The AI sometimes makes spelling errors in image labels. Please refer to the lesson text for the correct terminology.