Learning Journey
Watch this topic in 60 seconds
Free preview · Lesson 1
Understanding Using ruler & compass (Practical Geometry)
Mastering Practical Geometry: The Ruler and Compass Adventure (Grade 8)
Welcome, young explorers, to the fascinating world of Practical Geometry! Imagine you're a builder, an architect, or even a treasure map designer. What are the most fundamental tools you'd need to draw precise lines, perfect circles, and divide things equally? You guessed it – a ruler and a compass! These aren't just everyday stationery; they are powerful instruments that unlock the secrets of shapes and spaces.
In this foundational journey, we'll discover how to use these two simple tools to create amazing geometric figures with incredible accuracy. Think of it as learning the 'recipes' for drawing perfect shapes, where the ruler and compass are your essential kitchen utensils!
The Dynamic Duo: Your Ruler and Compass
The Ruler: Your Straight-Edge Sidekick
Your ruler, often called a 'straightedge' in geometry, is more than just a tool for drawing straight lines. It's your guide to precision!
- What it is: A flat, straight piece of plastic, wood, or metal with markings (like centimeters and inches).
- What it does:
- Draws Straight Lines: Just like a perfectly straight path for tiny ants, a ruler helps you draw lines that don't wobble.
- Measures Lengths: Those little marks? They help you measure how long a line segment is or to draw a line segment of a specific length. Think of it as a measuring tape, but for your notebook!
Analogy: Imagine you're drawing a perfectly straight road on a map. Your ruler is like the template that ensures your road never curves or goes off track. It's all about making things straight and measurable.
The Compass: Your Circle-Making Maestro
The compass is where the magic of curves and perfect circles happens! It's a tool that looks a bit like a pair of legs, but one leg has a sharp needle, and the other holds a pencil.
- What it is: A two-legged instrument used for drawing circles and arcs (parts of circles), and for transferring distances.
- What it does:
- Draws Perfect Circles: This is its superpower! By placing the needle firmly on a point (the center) and rotating the pencil leg, you can create a perfectly round circle. No more wobbly freehand circles!
- Draws Arcs: An arc is just a curved part of a circle. The compass can draw these too, which are essential building blocks for more complex constructions.
- Transfers Distances: You can 'pick up' a length from one place by setting the compass opening to that length, and then 'put it down' somewhere else. It's like a geometric 'copy-paste' tool for distances!
Analogy: Think of a compass as a painter's tool for perfect round shapes. The needle is like the fixed point where the painter holds their arm, and the pencil is like the brush that smoothly sweeps around to create a beautiful, even circle. Or imagine a spinning ride at an amusement park; the center pole is the needle, and the outer seats are tracing a perfect circle!
Basic Constructions: Your First Steps
Now that you know your tools, let's learn some fundamental 'recipes' to build geometric shapes. Remember, practice makes perfect!
Construction 1: Drawing a Line Segment of a Specific Length
This is your starting point for almost everything!
- Step 1: Place your ruler on your paper.
- Step 2: Mark a point, let's call it 'A', near one end of where you want your line segment to start.
- Step 3: Align the zero mark of your ruler with point 'A'.
- Step 4: Find the mark on the ruler that matches your desired length (e.g., 5 cm) and mark another point there, let's call it 'B'.
- Step 5: Carefully draw a straight line connecting point A and point B along the edge of your ruler.
Congratulations! You've drawn line segment AB, exactly the length you wanted.
Construction 2: Drawing a Circle with a Given Radius
Time to let your compass shine!
- Step 1: Decide on the radius of your circle (e.g., 3 cm).
- Step 2: Take your ruler and your compass. Place the compass needle on the '0' mark of the ruler.
- Step 3: Adjust the pencil leg of the compass until its tip rests precisely on the '3 cm' mark (or your chosen radius). This 'sets' your compass to the correct radius.
- Step 4: On your paper, mark a point. This will be the center of your circle, let's call it 'O'.
- Step 5: Place the sharp needle of the compass firmly on point 'O'.
- Step 6: Gently rotate the compass, holding it from the top, allowing the pencil leg to draw a smooth, continuous curve all the way around until it forms a complete circle. Make sure the needle stays put!
Voila! A perfect circle with a 3 cm radius.
Construction 3: Constructing the Perpendicular Bisector of a Line Segment
This construction is super useful for finding the exact middle of a line and drawing a line that cuts it perfectly at a right angle (90 degrees).
Analogy: Imagine you have a long piece of rope and you want to find its absolute middle AND cut it perfectly straight across so both pieces are identical. That's what a perpendicular bisector does for a line segment!
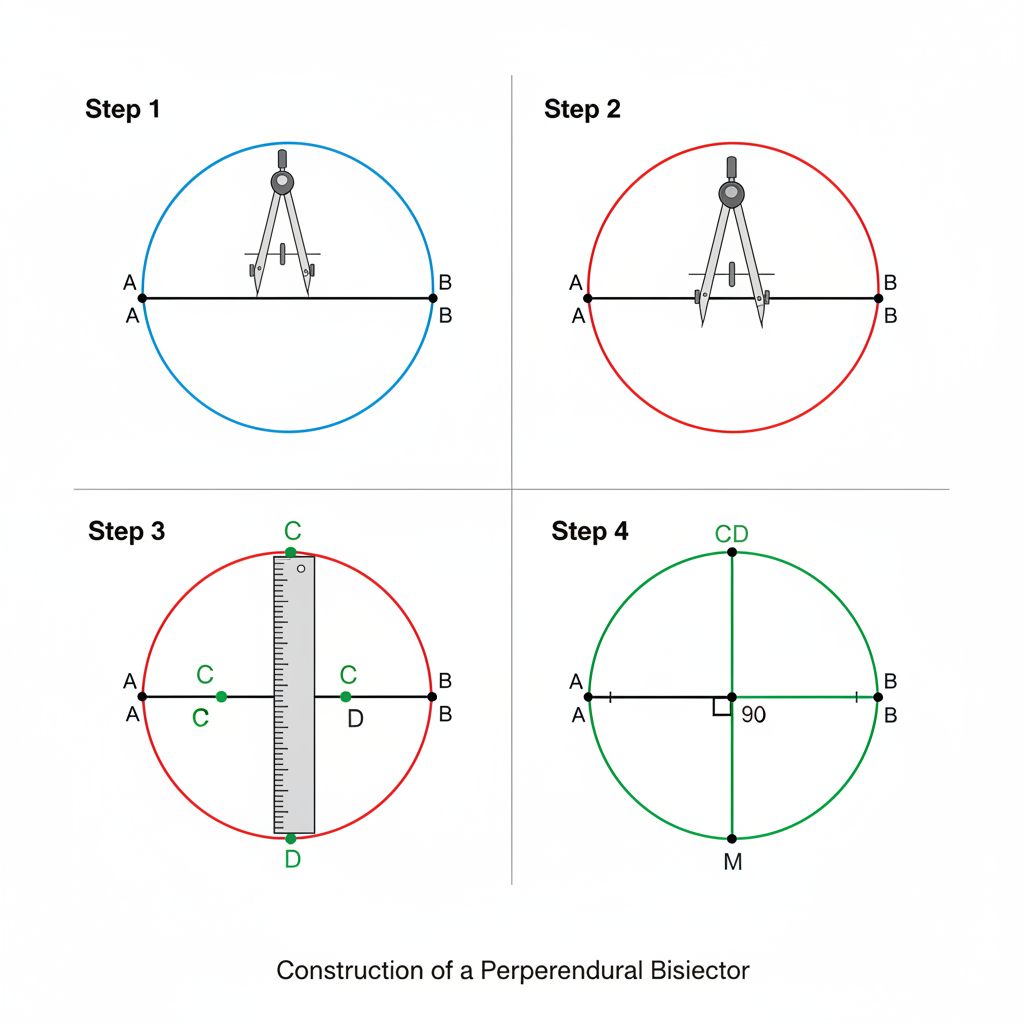 ⚠️ This picture may have spelling mistakes. Trust the words in the lesson.
- Step 1: Draw the Line Segment: First, draw a line segment, let's call it AB, of any length using your ruler.
- Step 2: Open Your Compass: Place the needle of your compass on point A. Open the compass so that its radius is more than half the length of AB. This is important! If it's less than half, your arcs won't cross.
- Step 3: Draw Arcs from A: With A as the center and the compass open to your chosen radius, draw an arc above the line segment AB and another arc below it.
- Step 4: Draw Arcs from B: Now, without changing the compass opening, place the needle on point B. Draw another arc above AB that intersects the first arc you drew. Then, draw another arc below AB that intersects the first arc below.
- Step 5: Connect the Intersection Points: You should now have two points where the arcs intersect – one above AB (let's call it P) and one below AB (let's call it Q).
- Step 6: Draw the Bisector: Use your ruler to draw a straight line connecting point P and point Q. This line PQ is the perpendicular bisector of segment AB! It cuts AB exactly in half and forms a 90-degree angle with AB.
Construction 4: Constructing the Angle Bisector of an Angle
An angle bisector is a ray (a line that starts at one point and goes on forever in one direction) that cuts an angle exactly in half, making two smaller, equal angles.
Analogy: Think of a delicious slice of pizza. If you want to share it equally with a friend, you'd cut it right down the middle, splitting the angle of the slice into two equal angles. That cut is the angle bisector!
- Step 1: Draw an Angle: First, draw any angle, let's call it ∠ABC, with point B as the vertex (the corner).
- Step 2: Draw an Arc: Place the needle of your compass on the vertex B. With any convenient radius (not too small, not too big), draw an arc that intersects both rays BA and BC of the angle. Let the intersection points be D on BA and E on BC.
- Step 3: Draw Arcs from D and E: Now, place the needle on point D. With a radius that is more than half the distance between D and E (you can keep the same radius as Step 2, or change it, but it must be the same for both D and E), draw an arc inside the angle.
- Step 4: Intersect Arcs: Without changing the compass opening, place the needle on point E. Draw another arc inside the angle that intersects the arc you just drew from D. Let the intersection point be F.
- Step 5: Draw the Bisector: Use your ruler to draw a straight line (or ray) from the vertex B through point F. This ray BF is the angle bisector of ∠ABC! It has divided ∠ABC into two equal angles, ∠ABF and ∠CBF.
Why Master These Tools? The Power of Precision
You might wonder why we don't just use a protractor to measure and draw angles or a ruler alone for everything. The beauty of ruler and compass constructions lies in their pure geometric nature. They allow us to create perfect figures based on mathematical principles, not just approximations from measurements. Historically, these tools were the cornerstone of geometry, allowing ancient civilizations to build magnificent structures and understand the universe around them.
Mastering these basic constructions gives you a foundational understanding of how shapes are built and how geometric properties relate to each other. It's like learning the fundamental chords on a guitar before you can play a symphony!
Tips for Aspiring Geometricians
- Hold the Compass Correctly: Always hold the compass from the top, not the legs, to ensure stability.
- Sharp Pencil: A sharp pencil in your compass and for your ruler lines makes your constructions much more accurate and neat.
- Firm Needle: Make sure the compass needle is firmly placed on the paper so it doesn't slip.
- Practice, Practice, Practice: Like any skill, geometry constructions get easier and more precise with practice. Don't be afraid to try multiple times!
- Label Everything: Label your points (A, B, C, O, P, Q, etc.) clearly. This helps you follow the steps and makes your work easy to understand.
Conclusion
Congratulations! You've taken your first steps into the powerful world of practical geometry. The ruler and compass are not just tools; they are keys to unlocking geometric precision and understanding. With these foundational skills, you're ready to tackle more complex constructions and appreciate the elegance of mathematics in the world around us. Keep practicing, and you'll soon be a geometry master!
Keep learning, free
Create a free Syllabax account to unlock practice questions and games for this topic.
Visual Learning Enhanced! 🚀
To help you master this topic, we use Advanced Syllabax AI to generate detailed diagrams and visual models.
Note on Visuals: The AI sometimes makes spelling errors in image labels. Please refer to the lesson text for the correct terminology.