Learning Journey
Watch this topic in 60 seconds
Free preview · Lesson 1
Understanding Pinhole camera[PHYSICS]
Understanding the Pinhole Camera: A Journey into Light and Images
Welcome, young scientists, to the fascinating world of optics! Today, we're going to explore a simple yet ingenious device called a pinhole camera. You might be surprised to learn that you can create a working camera with just a few common materials. We'll learn how it works and why it's a great way to understand fundamental principles of light.
What is a Pinhole Camera?
Imagine you're in a dark room, and there's a tiny hole in one of the walls. If you look through that tiny hole, you can see an image of the outside world projected onto the opposite wall! That, in essence, is a pinhole camera. It's a light-proof box with a very small hole (the 'pinhole') on one side, and a screen (like a wall or film) on the opposite side where an image forms.
The Magic of Light Rays
To understand how a pinhole camera works, we need to talk about light. Light travels in straight lines. Think of it like a laser beam – it goes straight from the source to where it hits something. This is a very important rule in physics!
Now, imagine an object, like a bright red apple. Light rays bounce off the apple in all directions. Some of these rays travel towards our pinhole camera.
How the Image is Formed: Upside Down and Inside Out!
Let's visualize this. Picture the apple in front of the pinhole camera. There are many light rays coming from the apple towards the hole.
Consider the very top of the apple. Light rays from the top travel downwards towards the pinhole. When they pass through the tiny pinhole, they continue traveling in a straight line to the screen inside the camera. Because they were coming from the top and traveled downwards, they hit the bottom part of the screen.
Similarly, consider the very bottom of the apple. Light rays from the bottom travel upwards towards the pinhole. After passing through the pinhole, they continue in a straight line and hit the top part of the screen.
What about the left side of the apple? Rays from the left pass through the pinhole and end up on the right side of the screen. And rays from the right side of the apple end up on the left side of the screen.
So, the image that forms inside the pinhole camera is upside down and reversed (left-to-right). It's like looking at the world through a funny mirror!
Why a Pinhole?
You might wonder, "Why not a big hole?" That's a great question! If the hole were large, light rays from different parts of the object would overlap on the screen, making the image blurry and indistinct. The smaller the pinhole, the sharper the image.
Think of it like trying to draw a picture with a fat crayon versus a fine-tipped pen. The fine-tipped pen gives you more detail. The pinhole acts like that fine-tipped pen for light.
However, if the pinhole is too small, the image can become dim. It's a balance!
The Science Behind It: Rectilinear Propagation of Light
The principle that light travels in straight lines is called the rectilinear propagation of light. This is the fundamental idea that makes the pinhole camera work. Because light rays don't bend (unless they hit something or pass through certain materials), the rays from each point on the object travel directly through the pinhole to a specific point on the screen, creating a clear, albeit inverted, image.
Building Your Own Pinhole Camera (A Simple Example)
You can make a basic pinhole camera with a cardboard box, some aluminum foil, and a sharp pin!
- Get a cardboard box (like a shoebox).
- Cut out a square hole on one side of the box.
- Cover this hole with a piece of aluminum foil, making sure it's smooth and tight.
- Carefully poke a tiny, clean hole in the center of the aluminum foil using a pin. This is your pinhole!
- On the opposite side of the box (the 'screen' side), you can either make a small window to look through, or, for a more permanent camera, you could try covering the inside with tracing paper or photo paper (with adult supervision!).
- Seal the box well so no light gets in, except through the pinhole.
- Go into a very dark room or wait until it's dark outside. Point the pinhole side towards a bright object (like a window with light coming through, or a lit lamp).
- Look at the opposite side of the box. You should see a faint, upside-down image of the object!
Pinhole Cameras in History and Nature
Pinhole cameras aren't just a fun science experiment; they have a long history! Before complex lenses were invented, people used pinhole-like principles to project images. Even today, you can experience a pinhole camera effect during a solar eclipse. If sunlight passes through small gaps between leaves on a tree, it can project tiny, upside-down images of the sun onto the ground. It's nature showing us the magic of pinholes!
Key Concepts to Remember:
- Light travels in straight lines.
- A pinhole camera uses a tiny hole to let light from an object form an image on a screen.
- The image formed is upside down and reversed.
- The smaller the pinhole, the sharper the image, but it can become dimmer.
Let's visualize how the light rays travel. Imagine looking at an arrow:
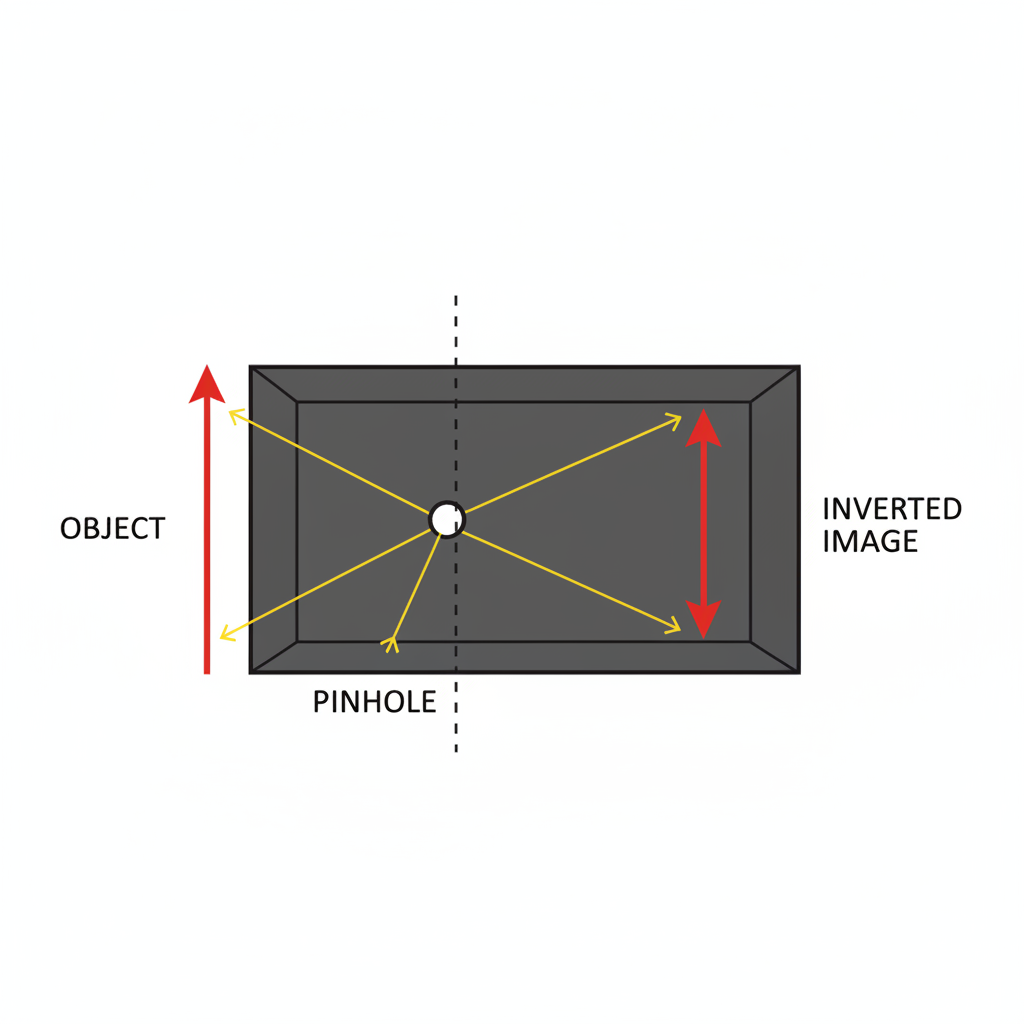
In the diagram above, notice how the light rays from the tip of the arrow travel through the pinhole and hit the bottom of the screen, and how rays from the tail of the arrow travel through the pinhole and hit the top of the screen. This straight-line travel of light is key!
Analogy Time!
Analogy 1: A crowd of people passing through a narrow doorway. Imagine a large group of people trying to get into a concert hall through a single, very narrow doorway. Each person has to go through one by one, in a specific order. The people who were at the front of the crowd will be the first through the door, and the people at the back will be the last. If you could magically see where each person ended up inside the hall, their relative positions would be maintained, but if you looked from the perspective of who came out first and last, it might seem reversed! The doorway is like the pinhole, and the people are like light rays.
Analogy 2: A tiny window in a dark room. Imagine you're in a pitch-black room. You can only see outside through a very small, clean window. You'll see a picture of the outside, but it might be a bit dim. If the window were huge, you'd get a lot more light, but the details might get jumbled because light from different angles would enter. The tiny window lets specific light rays through to create a clear, albeit perhaps not super bright, picture.
Analogy 3: A sieve for sand. Think of a sieve with very small holes. If you pour a lot of sand through it, only the fine grains get through, and they fall in a particular pattern. The sieve separates the sand. In a pinhole camera, the pinhole acts like the sieve, allowing only specific light rays to pass through and create an ordered image.
Keep learning, free
Create a free Syllabax account to unlock practice questions and games for this topic.
Visual Learning Enhanced! 🚀
To help you master this topic, we use Advanced Syllabax AI to generate detailed diagrams and visual models.
Note on Visuals: The AI sometimes makes spelling errors in image labels. Please refer to the lesson text for the correct terminology.