Learning Journey
Watch this topic in 60 seconds
Free preview · Lesson 1
Understanding Basic Web Page Structure (HTML)
Understanding the Blueprint of the Web: Basic HTML Structure
Have you ever wondered what makes a webpage appear the way it does? Just like a house needs a blueprint before it can be built, every webpage needs a special set of instructions to tell your computer (and web browser) how to display its content. These instructions are written in a language called HTML, which stands for HyperText Markup Language. Think of HTML as the skeleton or the framework of a webpage – it defines the structure, the different parts, and where everything goes.
HTML: The Blueprint of Your Digital House
Imagine you're an architect designing a house. You wouldn't just start throwing bricks around, right? You'd draw a detailed blueprint first. HTML is exactly like that blueprint for your website. It tells the browser where the title of the page goes, where the main text should be, where images belong, and how different pieces of information are related. It’s not about how pretty your house looks (that’s CSS!), but about what rooms it has, where the doors are, and where the windows are placed.
1. The Very First Line: The DOCTYPE Declaration
Before you even begin drawing your house, you might write a note at the top of your blueprint saying, "This is a modern house, follow standard building codes!" In HTML, we have something similar called the DOCTYPE declaration:
<!DOCTYPE html>This isn't an HTML tag itself, but rather an instruction to the browser. It tells the browser, "Hey! This is a modern HTML5 document, so render it using the latest rules." It's like telling your builder which rulebook to follow for the construction.
2. The Main Container: The <html> Tag
After your DOCTYPE declaration, everything else for your webpage goes inside the <html> tag. This tag acts like the main boundary of your entire house. All the rooms, walls, and furniture must be contained within it. It's the root element of every HTML page.
<!DOCTYPE html>
<html>
    <!-- All your webpage content will go here -->
</html>
3. The Brain of the Page: The <head> Tag
Inside your <html> house, the first major section is the <head> tag. Think of the <head> section as the brain or the control room of your webpage. It contains important information about the page that isn't directly visible to someone looking at the page itself. This includes things like the page's title, links to stylesheets (for styling), and other metadata that helps browsers and search engines understand your page.
It's like having a special room in your house dedicated to storing blueprints, emergency contacts, and a list of all the materials used – useful info, but not a room you'd typically hang out in.
The <title> Tag: Your Page's Name Tag
One of the most important tags inside the <head> is the <title> tag. This is the text that appears in the browser tab or window title bar. It's like putting a name tag on your house so people know what it is at a glance!
<!DOCTYPE html>
<html>
    <head>
        <title>My Awesome First Webpage!</title>
    </head>
    <!-- ... the rest of the page ... -->
</html>
4. The Visible Content: The <body> Tag
Now for the exciting part! After the <head> section, we have the <body> tag. This is where all the actual, visible content of your webpage goes. Everything you see on a website – the text, images, links, videos, buttons – it all lives inside the <body> tag.
If the <html> is the whole house, and <head> is the blueprint room, then the <body> is all the living spaces: the living room, kitchen, bedrooms, hallways. This is where people spend their time and see everything!
<!DOCTYPE html>
<html>
    <head>
        <title>My Awesome First Webpage!</title>
    </head>
    <body>
        <!-- All your visible text, images, links, etc. go here -->
    </body>
</html>
Common Tags You'll Use Inside the <body>
Now that we have our main house structure, let's look at some common furniture and decorations we can put inside the <body>.
Headings: <h1> to <h6>
Just like a newspaper has headlines of different sizes (main story, sub-story), HTML uses heading tags to organize content. <h1> is for the most important heading (like the title of an article), and <h6> is for the least important. They help break up your text and make it easier to read.
<h1>Welcome to My Page!</h1>
<h2>About Me</h2>
<h3>My Hobbies</h3>
Paragraphs: <p>
When you write a story, you organize your sentences into paragraphs. In HTML, the <p> tag is used for regular blocks of text. It stands for 'paragraph'.
<p>This is a paragraph of text on my amazing webpage. I hope you enjoy learning about HTML!</p>Links: <a> (Anchor Tag)
The internet is all about connecting! The <a> tag (short for 'anchor') creates a hyperlink, which is like a magic doorway that takes you to another page on the internet, or to a different section of the same page. You use an attribute called href (Hypertext Reference) to tell the link where to go.
<p>Click <a href="https://www.example.com">here</a> to visit another website!</p>Images: <img>
What's a webpage without pictures? The <img> tag is used to display images. Unlike most tags, it's a 'self-closing' tag, meaning it doesn't need a separate closing tag (</img>). It needs at least two important attributes:
src(source): This tells the browser where to find the image file.alt(alternative text): This provides a text description of the image. It's super important for accessibility (if someone can't see the image) and for search engines.
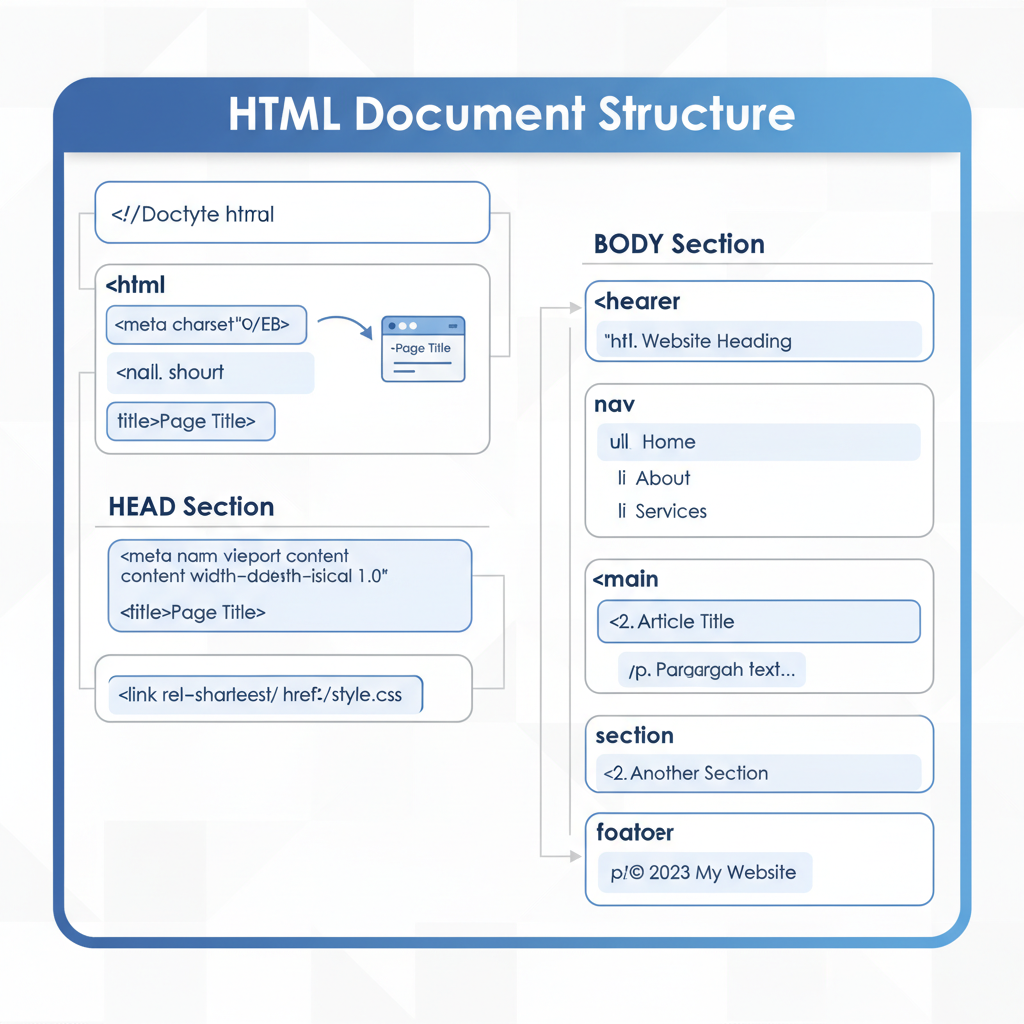 ⚠️ This picture may have spelling mistakes. Trust the words in the lesson.
<img src="my-picture.jpg" alt="A cute cat sitting on a keyboard">Lists: <ul>, <ol>, and <li>
Sometimes you need to list things, like a shopping list or a set of instructions. HTML has two main types of lists:
- Unordered List (
<ul>): This creates a bulleted list (like this one!). Think of it as a random collection of items. - Ordered List (
<ol>): This creates a numbered list. Think of it as step-by-step instructions.
Each item in either type of list uses the List Item (<li>) tag.
<h3>My Favorite Fruits (Unordered List)</h3>
<ul>
    <li>Apples</li>
    <li>Bananas</li>
    <li>Oranges</li>
</ul>

<h3>Steps to Make a Sandwich (Ordered List)</h3>
<ol>
    <li>Get two slices of bread.</li>
    <li>Spread peanut butter on one slice.</li>
    <li>Spread jelly on the other slice.</li>
    <li>Put the two slices together.</li>
</ol>
Elements, Tags, and Attributes: What's the Difference?
- Tag: These are the labels you use, like
<p>(opening tag) and</p>(closing tag). Think of them as the start and end parentheses for a block of content. - Element: An HTML element is made up of an opening tag, the content inside, and a closing tag. For example,
<p>This is a paragraph.</p>is a complete paragraph element. It's the whole package! - Attribute: These are extra bits of information you can add to an opening tag to give the element more specific instructions. For example, in
<a href="link.html">,href="link.html"is an attribute. It's like adding a sticky note to your 'doorway' tag that says 'this door leads to the kitchen!'
Nesting Tags: Boxes Inside Boxes
You'll notice that tags are often placed inside other tags. This is called nesting. Just like you can put a small box inside a bigger box, you can put an <img> tag inside a <p> tag, or a <p> tag inside the <body> tag. It's crucial to make sure your tags are properly nested and closed in the correct order. If you open a tag, you must close it before closing its parent tag. Think of it like a set of Russian nesting dolls!
<body>
    <h1>My Page</h1>
    <p>This is <strong>important</strong> text.</p>
</body>
Here, the <strong> tag (which makes text bold) is nested correctly inside the <p> tag.
Putting It All Together: A Basic HTML Page
Let's combine everything we've learned into one simple HTML page:
<!DOCTYPE html>
<html lang="en">
<head>
    <meta charset="UTF-8">
    <meta name="viewport" content="width=device-width, initial-scale=1.0">
    <title>My First Real Webpage</title>
</head>
<body>
    <h1>Hello, Web World!</h1>
    <p>This is my very first webpage built with HTML. I'm learning how to structure content.</p>
    <h2>What I've Learned Today:</h2>
    <ul>
        <li>The <code>!DOCTYPE html</code> declaration.</li>
        <li>The main <code>html</code> container.</li>
        <li>The <code>head</code> for page info, including the <code>title</code>.</li>
        <li>The <code>body</code> for all visible content.</li>
        <li>Common tags like <code>h1</code>, <code>p</code>, <code>a</code>, <code>img</code>, and lists.</li>
    </ul>
    <p>Check out more HTML tutorials <a href="https://www.w3schools.com/html/" target="_blank">here</a>!</p>
</body>
</html>
Congratulations! You've just taken your first big step into understanding how webpages are built. Remember, HTML is the foundational language for the entire web, and by mastering its basic structure, you're setting yourself up for success in creating amazing things online!
Keep learning, free
Create a free Syllabax account to unlock practice questions and games for this topic.
Visual Learning Enhanced! 🚀
To help you master this topic, we use Advanced Syllabax AI to generate detailed diagrams and visual models.
Note on Visuals: The AI sometimes makes spelling errors in image labels. Please refer to the lesson text for the correct terminology.