Word Processing Essentials
Watch this topic in 60 seconds
Free preview · Lesson 1
Understanding Word Processing Essentials
Word Processing Essentials: Your Digital Notebook!
Imagine you're writing an essay or a story. With a pen and paper, if you make a mistake, you might have to erase, cross out, or even start over on a fresh sheet. What if you want to move a whole paragraph from the beginning to the end? That would involve a lot of cutting and pasting (literally!) or rewriting everything.
This is where Word Processing comes to the rescue! Think of a word processor like a super-smart, endlessly erasable, and incredibly flexible digital notebook. Instead of pens and paper, you use a keyboard and a computer screen. The most common example of a word processor is Microsoft Word, but there are others like Google Docs or Apple Pages.
Why Use a Word Processor? (Beyond Magic Erasers!)
Word processors are powerful tools that make writing, editing, and organizing text much easier and faster. Here’s why they’re so fantastic:
- Easy Editing: Made a typo? Click, delete, type. Want to rephrase a sentence? No problem! It's like having an infinite supply of magic erasers that leave no trace.
- Neat and Tidy: All your documents will look professional and easy to read. No messy handwriting! This is like having a perfect calligrapher writing for you every time.
- Organized Storage: You can save your documents on your computer or in the cloud. Finding them later is as easy as looking in a well-organized digital filing cabinet. No more lost papers under your bed!
- Sharing: Need to send your report to your teacher or a friend? You can email it in seconds, or share a link. It’s like instantly teleporting your paper to anyone, anywhere.
- Formatting Fun: You can change how your text looks – make it bold, change its color, add headings. It's like having a whole art supply store for your words!
Getting Started: Your Digital Workspace
When you open a word processor, you'll usually see a few key areas:
- The Ribbon or Toolbar: This is like the control panel or dashboard of a car. It's usually at the top of the screen and contains all the buttons and menus for different commands – like saving, printing, changing fonts, or inserting pictures.
- The Document Area: This is the big, blank space in the middle. It's your digital paper, where you type all your text.
- The Cursor (Insertion Point): This is a blinking vertical line (I beam) you'll see in the document area. It's like the tip of your pen, showing you exactly where the next letter you type will appear.
- Scroll Bars: If your document is very long, you'll see bars on the side or bottom that allow you to scroll up, down, left, or right to view different parts of your text. Think of it as rolling a long scroll of ancient parchment to see all the content.
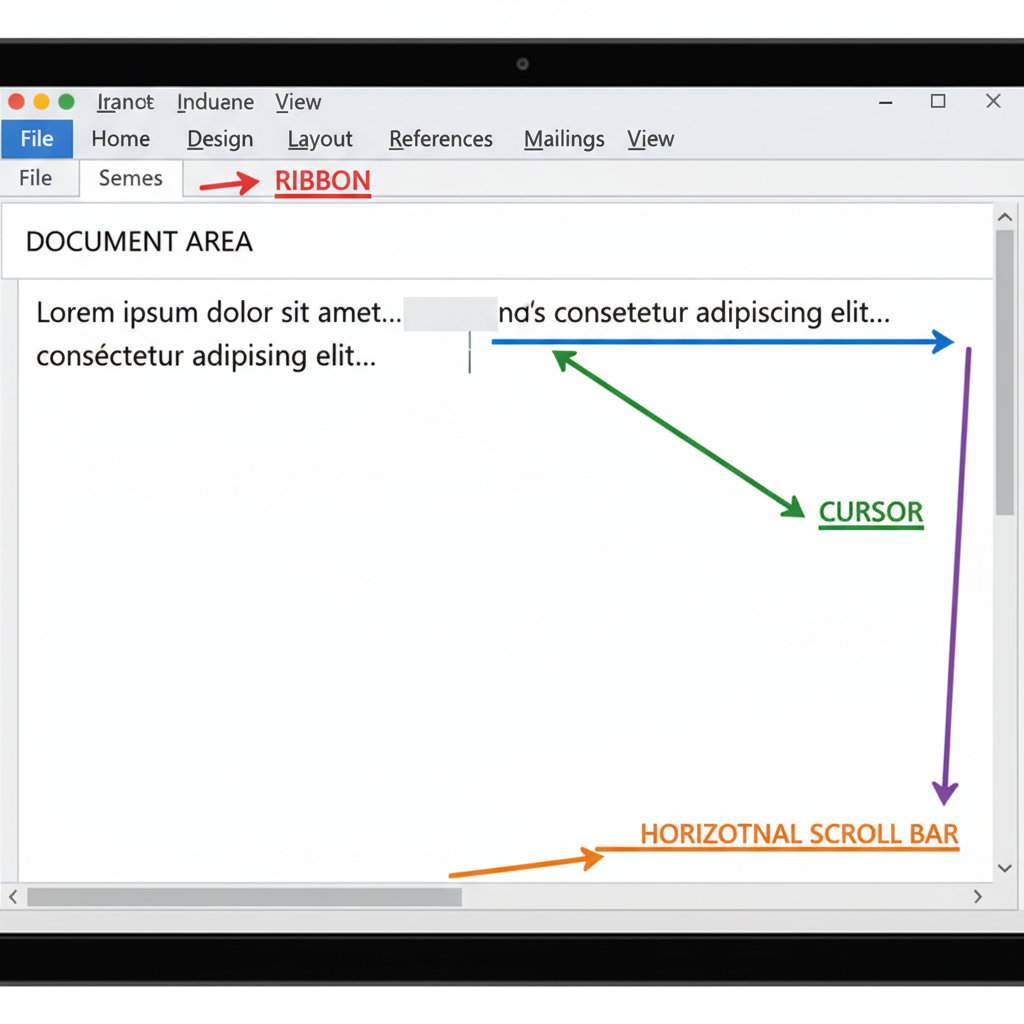 ⚠️ This picture may have spelling mistakes. Trust the words in the lesson.
An example of a word processing interface, showing the main components.
Essential Actions: Your Basic Tool Kit
1. Typing Text
This is simple! Just start typing on your keyboard. The text will appear at your cursor's location. When you reach the end of a line, the word processor automatically moves the text to the next line for you. This is called Word Wrap – no need to hit Enter at the end of every line like an old typewriter!
2. Saving Your Work (Crucial!)
Saving is probably the most important thing you'll do! It's like putting your precious handwritten notes into a sturdy folder or filing cabinet so you don't lose them. If you don't save, all your hard work can disappear if the computer shuts down or crashes. Look for a 'Save' button (often looks like a floppy disk icon) or go to 'File' > 'Save' or 'Save As'. Always save often!
3. Opening an Existing Document
When you want to continue working on something you saved earlier, you 'Open' it. This is like taking a specific file out of your filing cabinet. Go to 'File' > 'Open' and select your document.
4. Copy, Cut, and Paste: The Magic Movers!
These three commands are incredibly powerful for rearranging text:
- Copy: Makes an exact duplicate of selected text without removing the original. Think of it like a photocopy machine for words. You select the text, then click 'Copy'.
- Cut: Removes selected text from its original location. This is like using scissors to snip out a piece of paper. You select the text, then click 'Cut'.
- Paste: Inserts copied or cut text into a new location. This is like using glue to stick the photocopied or cut piece of paper somewhere else. You move your cursor to where you want the text, then click 'Paste'.
5. Undo and Redo: Your Time Machine!
Made a mistake? Don't panic! The 'Undo' button (often an arrow pointing left) is like a time machine that takes you back one step. Click it to reverse your last action. If you undo too much, the 'Redo' button (an arrow pointing right) can bring you forward again. These are your digital erasers for bigger oopsies!
Formatting Basics: Making Your Words Look Good!
Once you have your text, you can change its appearance using formatting tools. This is where your words get a makeover!
1. Font and Font Size
- Font: This refers to the specific style of letters. Some common fonts are Arial, Times New Roman, or Calibri. Think of different fonts as different styles of handwriting. You can choose one that fits the mood of your document.
- Font Size: This controls how big or small your text appears. It's measured in 'points'. Larger numbers mean larger text. This is like choosing to write with a fine-tip pen versus a thick marker.
2. Bold, Italic, Underline (B, I, U)
These are common ways to emphasize certain words or phrases:
- Bold (B): Makes text thicker and darker. Great for headings or important keywords. Like shouting your words.
- Italic (I): Slants the text slightly. Often used for book titles, foreign words, or to show emphasis. Like whispering your words.
- Underline (U): Draws a line beneath the text. Often used for emphasis or links (though less common for emphasis now, as it can be confused with web links). Like drawing a line under important notes.
3. Text Alignment
Alignment determines how your text is positioned on the page. Imagine organizing books on a shelf:
- Left Align: Most common. Text lines up perfectly along the left margin. Like books pushed all the way to the left side of the shelf.
- Center Align: Centers each line of text between the margins. Often used for titles or invitations. Like placing books in the middle of a shelf.
- Right Align: Lines up text along the right margin. Less common for main body text, sometimes used for dates or page numbers. Like books pushed all the way to the right side of the shelf.
- Justify: Spreads text evenly across the entire line, aligning both left and right margins (except for the last line of a paragraph). Often seen in newspapers or books. Like books perfectly filling the entire shelf, without gaps on either side.
Word processing might seem like a lot to learn at first, but with practice, these tools will become second nature, helping you create amazing documents with ease. Keep exploring and experimenting, and you'll be a word processing wizard in no time!
Keep learning, free
Create a free Syllabax account to unlock practice questions and games for this topic.
Visual Learning Enhanced! 🚀
To help you master this topic, we use Advanced Syllabax AI to generate detailed diagrams and visual models.
Note on Visuals: The AI sometimes makes spelling errors in image labels. Please refer to the lesson text for the correct terminology.