Word Processing Software Skills
Watch this topic in 60 seconds
Free preview · Lesson 1
Understanding Word Processing Software Skills
Welcome to the World of Word Processing!
Imagine you have a brilliant idea for a story, a school report, or even just a list of things you need to remember. In the old days, people would write everything by hand or use a typewriter. But what if you made a mistake? What if you wanted to change a paragraph or make your title stand out? That's where word processing software comes to the rescue!
What is Word Processing Software?
Think of word processing software as your personal, super-powered digital notepad and pen. It's a special program on your computer or tablet that allows you to create, edit, format, print, and save text-based documents. Instead of messy erasures or retyping entire pages, you can make changes instantly and perfectly.
Analogy: If writing by hand is like drawing with a crayon, word processing is like having a complete art studio with an endless supply of colors, tools, and an 'undo' button!
Why is Learning Word Processing Important?
In today's world, word processing skills are like a superhero's essential gadget – everyone needs them! Whether you're:
- Writing essays for school
- Creating a resume for a part-time job
- Typing up notes for a group project
- Designing a flyer for a school event
- Just sending a professional email
...you'll use word processing skills. They make your work look neat, professional, and easy to read.
Meet the Stars: Popular Word Processors
There are many different types of word processing software, but they all generally do the same job. Some popular examples you might encounter include:
- Microsoft Word: Often just called 'Word', it's one of the most widely used programs.
- Google Docs: A free, web-based option that's great for collaboration (working with others at the same time).
- LibreOffice Writer: Another free and open-source option, similar to Microsoft Word.
- Apple Pages: For those using Apple computers and devices.
While they might look a little different, the basic skills you learn for one will often apply to others. It's like learning to drive one type of car; you can generally figure out how to drive another!
Understanding the Word Processor's Main Parts (The User Interface)
When you open a word processing program, you'll see a screen full of tools and a blank page. Let's break down the main areas:
-
The Ribbon/Menu Bar: Your Command Center
At the very top of the screen, you'll usually find the 'Ribbon' (in Microsoft Word) or 'Menu Bar'. This is where all your tools and commands live. Think of it like the dashboard of a car, with all the buttons and dials for controlling everything – from changing your font to saving your document.
- Tabs: The Ribbon is often organized into 'tabs' (like Home, Insert, Page Layout). Each tab groups related tools together.
- Groups: Within each tab, tools are further organized into 'groups' (like Font, Paragraph, Styles).
- Commands: These are the individual buttons you click to perform an action (like Bold, Italic, Save).
-
The Document Area: Your Blank Canvas
This is the big, white space in the middle of your screen. It's your blank page, ready for you to type your thoughts, stories, and reports. Everything you type will appear here.
-
The Status Bar: Your Information Hub
Usually at the very bottom of the screen, the Status Bar gives you quick information about your document, like the current page number, word count, and zoom level. It's like the little voice in your ear telling you how you're doing!
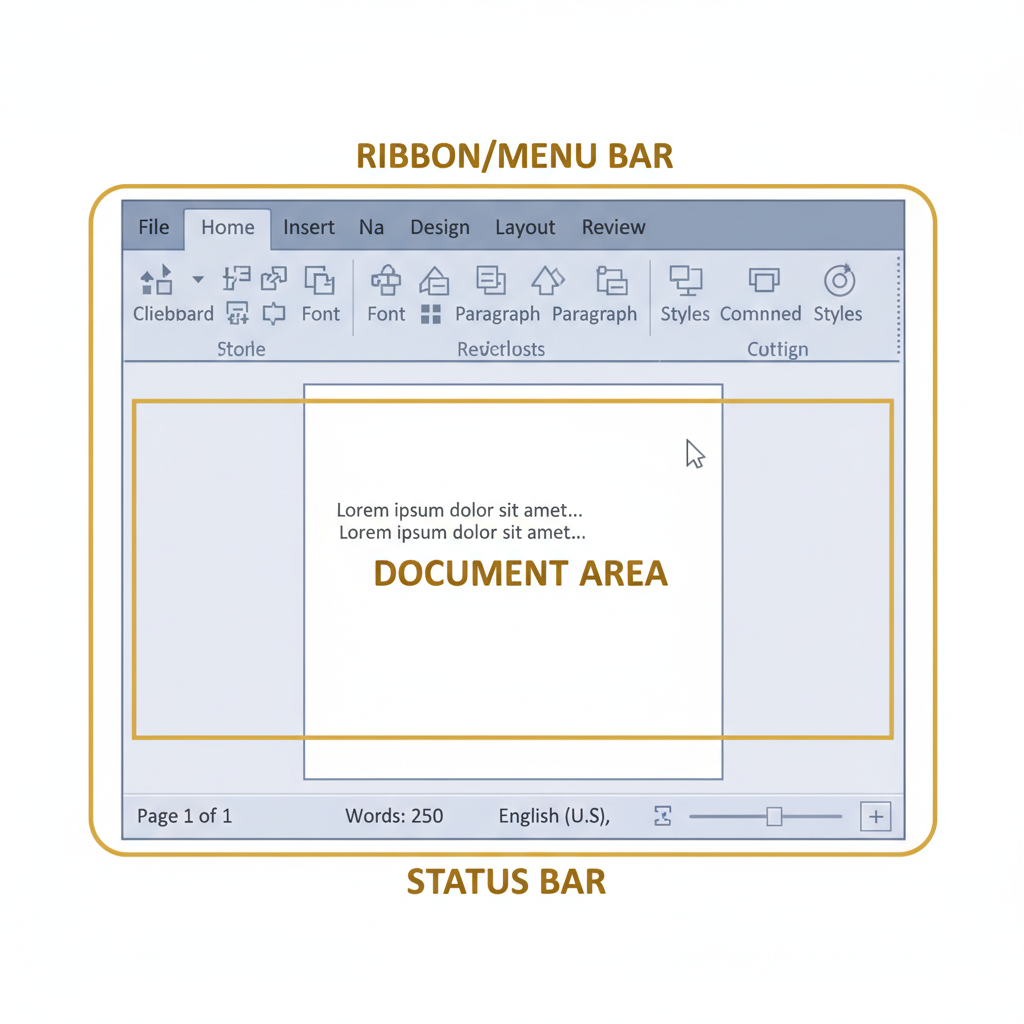 ⚠️ This picture may have spelling mistakes. Trust the words in the lesson.
Getting Started: Basic Text Entry and Editing
The simplest thing you can do is type! Your keyboard is your main input device. As you type, the words appear in the document area at the flashing vertical line, called the insertion point (or cursor). It's like where your pen touches the paper.
- Typing: Just start typing!
- Spacebar: Creates a space between words.
- Enter/Return Key: Starts a new paragraph or moves to the next line.
- Backspace Key: Deletes text to the LEFT of the insertion point.
- Delete Key: Deletes text to the RIGHT of the insertion point.
- Arrow Keys: Move the insertion point around your document without deleting text.
Making Your Words Look Good: Basic Formatting
This is where you give your text personality! Formatting tools let you change how your text appears. Think of it like choosing different clothes for your words to wear.
To format text, you first need to select it. You do this by clicking and dragging your mouse over the text you want to change, or by holding Shift and using the arrow keys. Once selected, it usually highlights, letting you know it's ready for changes.
Common Formatting Options:
-
Font Type, Size, and Color
Font Type (e.g., Arial, Times New Roman, Calibri): This is the style of the letters themselves. Each font has a unique look, just like different handwriting styles. You can pick a fancy one for a title or a simple one for the main text.
Font Size (e.g., 12pt, 14pt, 18pt): This controls how big or small your letters are. Larger sizes are great for headings; smaller sizes are good for the main body.
Font Color: You can change the color of your text to make certain words stand out or match a theme.
-
Bold, Italic, and Underline
These are three very common ways to emphasize text:
- Bold (B): Makes text thicker and darker. It's like shouting a word to make sure people notice it!
- Italic (I): Slants the text slightly. Great for titles of books or for adding a bit of flair.
- Underline (U): Draws a line beneath the text. Often used for links or to highlight important information.
-
Text Alignment
Alignment determines how your text lines up on the page. Think of it like arranging furniture in a room – where do you want the main items to sit?
- Align Left: The most common. Text lines up neatly along the left margin. (Like most books you read).
- Align Right: Text lines up along the right margin. Often used for dates or short addresses.
- Center Align: Text is centered between the left and right margins. Perfect for titles and headings.
- Justify: Text is evenly spaced between both the left and right margins, creating clean, straight edges on both sides. (Often used in newspapers and magazines).
Essential Actions: Saving, Opening, Copy, Cut, Paste, and Undo/Redo
Saving and Opening Documents
-
Saving: Don't Lose Your Work!
Imagine building an amazing sandcastle. If you don't save it by taking a picture, it will eventually wash away! Similarly, if you don't save your document, all your hard work disappears when you close the program or if your computer shuts down unexpectedly.
- Save As: The first time you save a document, you usually use 'Save As'. This lets you choose a name for your file and pick where on your computer you want to store it (like putting your sandcastle picture in a specific album).
- Save: After the first save, you'll use 'Save' regularly. This updates the existing file with your latest changes. Make it a habit to save often!
- File Names: Give your files clear, descriptive names (e.g., 'English_Essay_Draft1.docx' instead of 'asdf.docx').
- File Extensions: Word processing files often end with extensions like
.docx(Microsoft Word) or.odt(LibreOffice Writer). These tell the computer what type of file it is.
-
Opening Documents
This is how you retrieve your saved work. You go to 'File' > 'Open', then navigate to where you saved your file. It's like taking your picture out of the album to look at it again!
Copy, Cut, and Paste: Moving Information Around
These three actions are incredibly powerful and save a lot of retyping!
- Copy (Ctrl+C or Cmd+C): Makes an exact duplicate of selected text or an image, leaving the original in place. It's like taking a photocopy of something.
- Cut (Ctrl+X or Cmd+X): Removes the selected text or image from its original location. It's like physically cutting something out with scissors.
- Paste (Ctrl+V or Cmd+V): Inserts the copied or cut item into the document at the insertion point. It's like gluing the photocopy or cut-out piece onto a new page.
When you copy or cut something, it's temporarily stored in a special place called the 'clipboard'. You can paste from the clipboard multiple times until you copy or cut something new.
Undo and Redo: Your Time Machine!
- Undo (Ctrl+Z or Cmd+Z): This is your best friend when you make a mistake! It reverses your last action. Made a typo? Click Undo! Accidentally deleted a paragraph? Click Undo! It's like having a rewind button for your writing.
- Redo (Ctrl+Y or Cmd+Y): If you undo something and then realize you wanted it back, Redo will reverse the Undo action. It's like fast-forwarding after a rewind.
Making Lists: Bulleted and Numbered
Lists are fantastic for organizing information and making it easy to read. Word processors make creating them a breeze!
-
Bulleted Lists
Use bulleted lists for items where the order doesn't matter (like a shopping list). Each item starts with a symbol (a dot, square, etc.).
- Milk
- Bread
- Eggs
-
Numbered Lists
Use numbered lists when the order of items is important (like steps in a recipe or instructions). Each item gets a number.
- Preheat oven to 350°F.
- Mix ingredients in a bowl.
- Pour into baking pan.
Conclusion
You've just taken your first big steps into the world of word processing! These foundational skills – understanding the interface, basic typing, formatting, saving, and using cut/copy/paste – are the building blocks for creating incredible documents. Keep practicing, and you'll soon be a word processing wizard, making your ideas shine clearly and professionally on screen and on paper!
Keep learning, free
Create a free Syllabax account to unlock practice questions and games for this topic.
Visual Learning Enhanced! 🚀
To help you master this topic, we use Advanced Syllabax AI to generate detailed diagrams and visual models.
Note on Visuals: The AI sometimes makes spelling errors in image labels. Please refer to the lesson text for the correct terminology.