Basic Photo Editing
Watch this topic in 60 seconds
Free preview · Lesson 1
Understanding Basic Photo Editing
Welcome to the World of Basic Photo Editing!
Hey there, future photo wizards! Have you ever taken a picture that looked almost perfect, but maybe it was a little too dark, or had something in the background you didn't want? Or maybe you just wanted to make the colors pop a little more? Well, you're in luck! Today, we're going to explore the exciting and super fun world of Basic Photo Editing. Think of it like being an artist, but instead of paint, you're using digital tools to make your photos look their very best!
What is Photo Editing, Anyway?
Simply put, photo editing is the process of changing or improving a digital image. It's like giving your photo a little makeover! Just like you might tidy up your room to make it look nicer, we can tidy up our photos to make them more appealing, clearer, or just more fun. Don't worry, we're not talking about anything super complicated, just the basic, easy-to-learn steps that anyone can do, even with a smartphone or a simple computer program.
Why Do We Edit Photos?
There are lots of reasons why people edit photos:
- To Fix Mistakes: Sometimes a photo is too bright, too dark, or a little blurry. Editing can often help fix these common problems.
- To Make Them Look Better: We can enhance colors, make details clearer, or remove distracting elements to make the main subject stand out.
- To Express Creativity: Editing is a way to add your personal touch, changing the mood or style of a photo to match what you imagine.
- To Prepare for Sharing: Whether it's for a school project, showing friends, or posting online, a well-edited photo looks more professional and attractive.
Our Digital Tool Kit: Basic Editing Concepts
Let's dive into some of the most common and useful tools you'll find in almost any photo editing app or program. Each one is like a different crayon in your digital art box!
1. Cropping: The Digital Scissors
Imagine you've drawn a fantastic picture, but there's a tiny bit of messy paper around the edges, or maybe a part of the drawing you don't want to show. What do you do? You grab a pair of scissors and trim it away! Cropping in photo editing is exactly like that. It means cutting off the unwanted edges or parts of your photo. You can use it to remove distractions, change the shape of your photo (like making a wide photo tall), or to focus more closely on your main subject.
Analogy: Cropping is like using a picture frame. You choose what part of your photo goes inside the frame and what gets left out.
2. Rotating: Spinning Your Viewpoint
Have you ever taken a picture, only to realize later that you held your camera sideways, and now everything is tilted? Or maybe you want to turn a portrait (tall) photo into a landscape (wide) photo? That's where Rotating comes in! This tool lets you spin your photo around, usually by 90 degrees at a time, until it's upright or in the orientation you want. Some tools even let you make small adjustments, like straightening a slightly crooked horizon.
Analogy: Rotating is like turning a physical photograph on your desk until it's facing the right way up.
3. Brightness: Controlling the Light
Sometimes, your photo looks dull and dark, like a cloudy day. Other times, it might be too bright, like staring at the sun! Brightness is the tool that lets you adjust how light or dark your entire photo appears. Turning up the brightness can make a gloomy photo look clearer, while turning it down can bring out details that were washed out by too much light. It's all about finding that perfect balance.
Analogy: Think of brightness like a dimmer switch for a light bulb. You can make the light stronger (brighter photo) or weaker (darker photo).
4. Contrast: The Difference Maker
Imagine a drawing where all the colors are dull and blend into each other, or a picture with vibrant, stark differences between light and dark. That difference is Contrast. Contrast refers to how much difference there is between the lightest parts and the darkest parts of your photo. Increasing contrast makes the bright areas brighter and the dark areas darker, giving your photo more punch and making colors stand out. Decreasing contrast can make a photo look softer or more dreamlike.
Analogy: Contrast is like the difference between a high-five and a whisper. A high-five (high contrast) is clear and impactful, while a whisper (low contrast) is soft and gentle.
5. Color Adjustments: Painting with Light
Colors are super important in photos! Basic color adjustments often include:
- Saturation: This is like turning up or down the 'colorfulness' of your photo. If you increase saturation, colors become more vivid and intense, like a rainbow after rain. If you decrease it, colors become duller, eventually turning your photo black and white.
- Warmth/Temperature: Some photos look too blue (cool) or too orange (warm). This tool lets you adjust the color 'temperature' to make your photo feel warmer (more yellows/oranges, like a sunset) or cooler (more blues, like a winter morning).
Analogy: Saturation is like adjusting the volume of colors. Turn it up, and they shout! Turn it down, and they whisper. Warmth is like putting on a cozy sweater (warm colors) or jumping into a cool pool (cool colors).
6. Red-Eye Removal: Bye-Bye Red Eyes!
Ever taken a picture of your pet or a friend, and their eyes look like glowing red dots? That's called 'red-eye effect,' and it happens because of the camera's flash reflecting off the back of the eye. Luckily, most basic photo editors have a super simple tool for Red-Eye Removal that can magically fix this with just a tap or click!
Analogy: Red-eye removal is like a digital 'magic eraser' specifically designed to fix those glowing red eyes.
7. Sharpening & Blurring: Focus and Softness
Sometimes a photo can look a little fuzzy, or you want to make a specific part of it super clear. That's where Sharpening comes in. It enhances the edges and details, making things look crisper. On the other hand, Blurring does the opposite – it makes parts of the image less clear and softer, which can be useful for making backgrounds less distracting or creating a dreamlike effect.
Analogy: Sharpening is like putting on your glasses to see clearly, while blurring is like taking them off to make things soft and hazy.
Your First Steps in Photo Editing
You don't need fancy, expensive software to start! Many smartphones have excellent built-in editing tools in their photo apps. Simple computer programs like Microsoft Photos (Windows) or Photos (Mac) also offer these basic features. Explore them!
The best way to learn is to practice. Take some of your own photos and play around with these tools. Don't be afraid to experiment – you can almost always undo your changes if you don't like them. Soon, you'll be making your pictures look amazing with just a few taps or clicks!
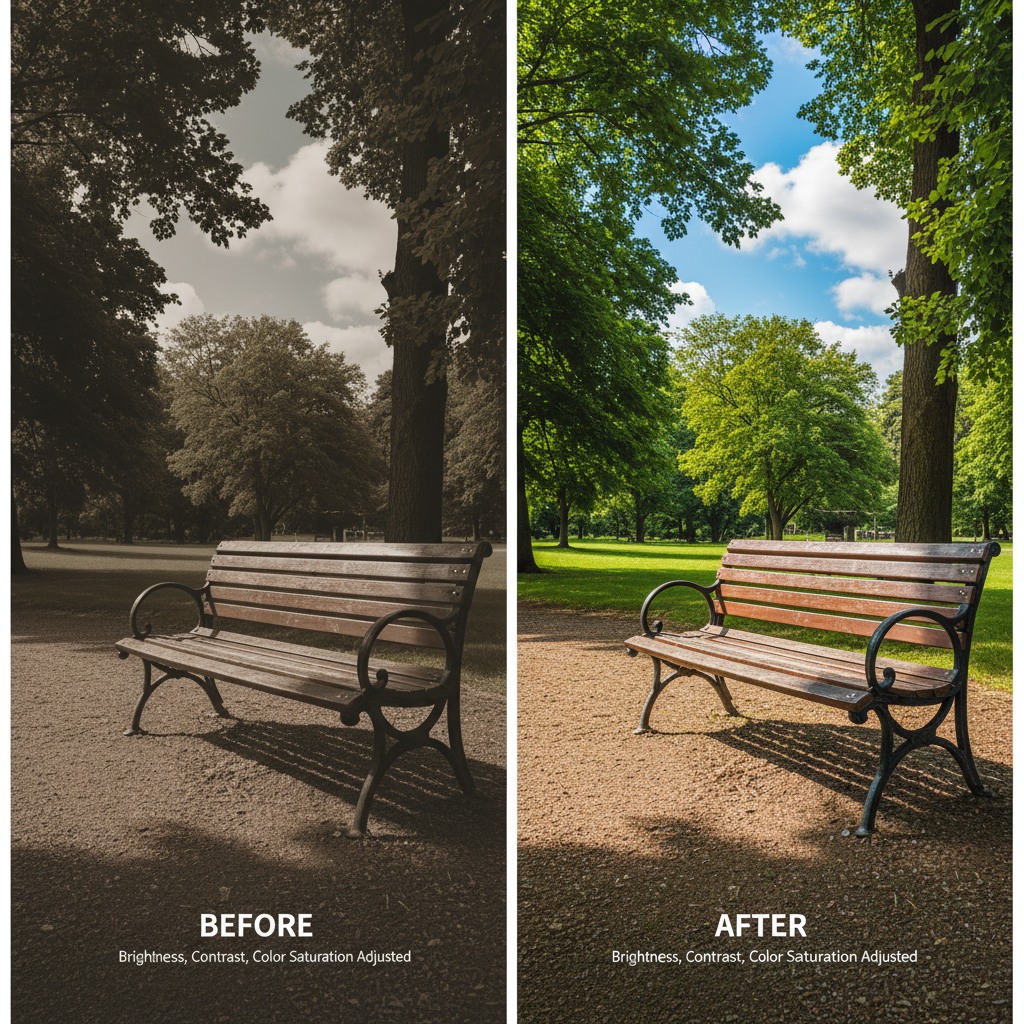
Remember, photo editing isn't about making fake pictures; it's about making your good pictures even better, capturing the true beauty of the moment, or expressing your own unique style. Happy editing!
Keep learning, free
Create a free Syllabax account to unlock practice questions and games for this topic.
Visual Learning Enhanced! 🚀
To help you master this topic, we use Advanced Syllabax AI to generate detailed diagrams and visual models.
Note on Visuals: The AI sometimes makes spelling errors in image labels. Please refer to the lesson text for the correct terminology.